UiPath is the No 1 Automation Software Company in 2024. UiPath helps Industries by making their process automated, which provides benefits to the company like Cost Saving and good Customer experience, High ROI and Work-life balance.
That is the reason why this days companies looking for UiPath automation engineers, and companies are posting UiPath Jobs.
If you want to make a career in uiPath and looking UiPath Interview Questions and Answers – 2024 for freshers, Experienced, Solution architects, or for Business Analysis then you are in the right place. We are providing you UiPath Best QnA Interview Question list to clear the interview in 2024 and get your dream Job in UiPath 2024.
You will get the UiPath interview questions on UiPath Studio, Document Understanding, Orchestrator, Test Manager, AI Center, Market Place & Integration, Insights, App, Assistance, Action Center, Chat Bot, Automation hum, Task Capture, Process Mining, and Task Mining.
UiPath Interview Questions And Answers 2024
Below section and answers to assist you in confidently navigating your RPA UiPath interview. The interview questions can often be confusing and tricky, and our list covers a wide range of topics to ensure you are well-prepared. lets begin for UiPath Interview Questions And Answers 2024
Fresher Level UiPath Interview Questions and Answers
What is RPA?
RPA stands for Robotic Process Automation, You can also be called a software robot that acts as a Human, performing human tasks like logging into applications, sending emails, MIS data massaging, and Copying files from one location to another. In simple a robot performs the automation of process.
What are the types of workflows present in RPA UiPath?
Workflows present in RPA UiPath-min
UiPath offers various workflow structures to cater to diverse automation needs. Here’s a breakdown of the key types:
Sequences:
Designed for: Simple, linear processes with a clear beginning and end.
Best suited for: Tasks like data entry, file manipulation, or step-by-step UI navigation.
Benefits: Easy to build, understand, and maintain due to their straightforward, top-down execution.
Flowcharts:
Designed for: Complex processes with decision points and branching paths.
Best suited for: Scenarios requiring conditional logic or handling multiple outcomes within a single workflow.
Benefits: Visually represent complex logic with diamonds (decisions) and arrows (paths) for clear understanding.
Caution: Avoid cluttering large workflows with excessive arrows to prevent confusion.
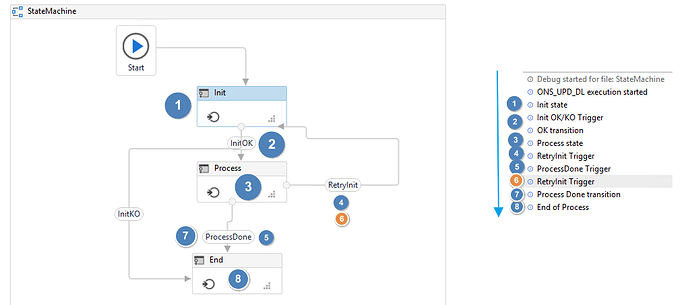
State Machines:
Designed for: Processes involving distinct stages and transitions between them.
Best suited for: Scenarios with repetitive cycles or where events dictate the next step (e.g., transaction processing).
Benefits: Compactly represent logic through pre-defined states and triggers, making them ideal for high-level process diagrams with various states and transitions.
Applications: Often used for structured management of complex business processes.
Global Exception Handler:
Designed for: Identifying and handling errors during workflow execution.
Benefits:
Invaluable for managing exceptions in any sized automation project.
Streamlines debugging by providing a centralized location for error handling.
Enhances overall workflow reliability and robustness.
What are the main components of UiPath?
UiPath Component listUiPath can be broken down into two main sections: client-side components and server-side components. The client-side components are the ones you interact with directly. These include:
Client-Side Components
UiPath Studio: This is the integrated development environment (IDE) where users design and build automation workflows. It features a visual interface with drag-and-drop functionality, making automation creation accessible.
UiPath Robot: This software program executes the workflows designed in Studio. Robots can operate in two modes: unattended (running in the background) or attended (requiring user interaction).
UiPath Agent: Acting as a bridge between Studio and the Robot, this component manages the execution of automations on the machine where it’s installed.
In addition to these core components, UiPath provides other client-side tools such as:
Browsers: UiPath integrates with common browsers to automate web-based actions since many tasks involve interactions with web applications.
UiPath Assistant: This desktop application enables users to run and manage automations directly from their computers, providing a convenient interface for automation execution.
Server-Side Components
On the server side, UiPath offers a central management platform:
UiPath Orchestrator: This web-based platform serves as the central hub for managing robots, workflows, and automations across the organization. Users can schedule deployments, monitor robot performance, and track automation success, among other features
Below are additional component
UiPath AI Fabric: AI Fabric is an AI/ML platform integrated into UiPath that enables users to build, deploy, and manage machine learning models for use in automation workflows. It provides capabilities for training, inference, and monitoring of ML models.
UiPath Automation Hub: Automation Hub is a collaborative platform for managing automation ideas, prioritizing automation initiatives, and tracking the progress of automation projects. It facilitates communication and collaboration among business users, developers, and automation experts.
UiPath Marketplace: The UiPath Marketplace is a centralized repository of reusable automation components, pre-built workflows, integrations, and AI models contributed by UiPath partners and the broader automation community. It allows users to discover, share, and download automation assets to accelerate their automation projects.
Document Understanding: Document Understanding in UiPath involves extracting valuable information from documents, leveraging advanced capabilities for data extraction and analysis.
Test Manager: Test Manager in UiPath supports the testing of automation workflows, providing tools for debugging, testing, and validating the performance of bots.
AI Center: AI Center is a component for managing and deploying machine learning models in UiPath, enhancing the capabilities of automation with artificial intelligence.
Marketplace & Integration: UiPath Marketplace is an online platform offering a variety of pre-built automation components, fostering collaboration and accelerating development through integrations.
Insights: Insights in UiPath provides analytics and reporting of process , offering valuable insights into the performance and efficiency of automation processes.
App: The UiPath App facilitates access to automation solutions from mobile devices, enabling users to monitor and manage bots remotely.
Assistance: UiPath Assistance refers to the support and guidance available through the UiPath community and forums, fostering collaborative learning and problem-solving.
Action Center: Action Center is a component for managing, executing, and tracking human-in-the-loop (HITL) tasks, improve the communication between bots and humans.
Chat Bot: UiPath Chat Bot enables the integration of chat-based interactions within automation workflows, enhancing communication and interaction capabilities.
Automation Hub: Automation Hub is a platform for managing automation ideas, fostering collaboration and innovation within an organization’s automation initiatives.
Task Capture: Task Capture is a tool for capturing, documenting, and analyzing user interactions, aiding in the identification and documentation of automation opportunities.
Process Mining: UiPath Process Mining allows organizations to analyze and optimize business processes by visualizing and understanding how processes are executed in reality.
Task Mining:Task Mining involves capturing and analyzing user interactions with digital systems to identify automation opportunities and improve overall efficiency.
What is UiPath Explorer?
UiPath Explorer
UiPath Explorer is a part of UiPath Studio, the integrated development environment (IDE) used for creating automation workflows. UiPath Explorer is particularly useful in the context of automating tasks involving graphical user interfaces (GUIs).
Key features of UiPath Explorer include:
Element Selection: UiPath Explorer allows users to select and highlight individual elements within an application’s user interface. it is Useful for identifying the UI elements that need to be automated.
Properties Viewer: Users can view the properties of selected UI elements, such as selectors, attributes, and values. this very important for identify the selector of automation.
Live Highlighting: UiPath Explorer provides live highlighting, making it easier to visualize and confirm the selected UI elements.
Accessibility Information: It offers information on the accessibility properties of UI elements, ensuring that automation is inclusive and compatible with accessibility standards.
Selector Editor: Users can fine-tune or edit selectors directly within UiPath Explorer, allowing for precise control over the identification of UI elements.
UiPath Explorer improve the efficiency and accuracy of the automation process, and this value are captured by the UiPath Explorer. Ref:- UiPath
What is the Benefit of RPA?
Cost Savings: RPA can perform repetitive and rule-based tasks 24/7 without breaks, leading to significant cost savings compared to human labor.
Increased Accuracy: RPA bots execute tasks with precision, reducing the likelihood of errors that can occur due to human fatigue or oversight.
Efficiency: Automation of routine tasks allows employees to focus on more complex and strategic activities, improving overall efficiency.
Faster Processing: RPA bots can complete tasks at a faster pace than humans, leading to quicker processing times for various business operations.
Scalability: RPA solutions can easily scale up or down based on the volume of work, providing flexibility to adapt to changing business needs.
24/7 Availability: RPA bots can work around the clock, enhancing the speed of task completion and ensuring continuous operations.
Improved Compliance: RPA ensures that processes are executed consistently, reducing the risk of non-compliance with regulations or internal policies.
Enhanced Analytics: By automating data entry and processing, RPA contributes to improved data accuracy, enabling better analytics and decision-making.
Employee Satisfaction: Automation of mundane tasks allows employees to engage in more meaningful and creative work, leading to higher job satisfaction.
Quick Return on Investment (ROI): RPA implementations often result in a rapid return on investment due to the efficiency gains and cost savings achieved.
What is COE for RPA, and what are its key components?
COE stands for Center of Excellence. It serves as a centralized hub responsible for governing, managing, and optimizing the organization’s RPA initiatives. The key components of an RPA COE typically include governance frameworks, standardized processes, training programs, best practices documentation, and a team of skilled professionals overseeing the RPA implementation and maintenance. The COE ensures the efficient and effective deployment of RPA across various business units, fostering collaboration, consistency, and continuous improvement.
What are the Roles associated with a Center of Excellence (COE) in RPA?
A Center of Excellence (COE) in RPA involves various roles that collectively contribute to the successful governance, management, and optimization of the organization’s RPA initiatives. Key roles typically include:
Program Manager: Oversees the overall RPA program, ensuring alignment with organizational goals and objectives.
Business Analysts (BA): Analyze existing processes to identify automation opportunities and design effective RPA solutions.
Developers: Build and implement automation solutions using RPA tools, adhering to best practices and standards.
Solution Architect: Designs the overall architecture of RPA solutions, ensuring scalability and efficiency.
Infrastructure Engineer: Manages the technical infrastructure required for RPA deployment and operation.
Trainer: Provides training programs to upskill team members on RPA tools and methodologies.
Quality Assurance (QA) Analyst: Conducts testing and quality assurance to ensure the reliability and accuracy of RPA implementations.
Support Specialist: Provides ongoing support and troubleshooting for deployed RPA solutions.
Governance Manager: Establishes and enforces governance frameworks, policies, and compliance standards for RPA initiatives.
Change Manager: Manages the organizational change associated with RPA implementations, ensuring smooth transitions.
These roles collectively contribute to the COE’s mission of fostering collaboration, standardization, and continuous improvement in the organization’s RPA efforts.
What factors are considered in calculating the TCO for an RPA solution, and how do you determine the overall TCO?
Calculating the Total Cost of Ownership (TCO) for an RPA solution involves taking into account various factors that contribute to the overall expenses associated with implementing and maintaining the automation. Some key factors influencing TCO include initial setup costs, licensing fees, infrastructure requirements, ongoing maintenance, training, and potential scalability needs. By comprehensively assessing these elements, one can derive an accurate TCO for an RPA solution, aiding in effective budgeting and decision-making.
Describe the significance of governance in RPA implementations and outline the steps to establish effective governance practices.
Significance of Governance:
Ensures alignment with organizational goals.
Manages risks associated with automation.
Provides a framework for accountability and responsibility.
Steps for Effective Governance:
Define Clear Objectives:
Establish specific goals for RPA initiatives.
Align objectives with overall business strategies.
Create Governance Framework:
Develop a structured governance framework.
Define roles, responsibilities, and decision-making processes.
Risk Management:
Identify potential risks in RPA implementations.
Implement risk mitigation strategies.
Regular Audits and Assessments:
Conduct periodic audits to evaluate RPA processes.
Assess adherence to governance guidelines.
Stakeholder Communication:
Foster transparent communication with stakeholders.
Keep stakeholders informed about progress and outcomes.
Continuous Improvement:
Establish mechanisms for continuous improvement.
Adapt governance practices based on feedback and changing requirements.
Training and Awareness:
Provide training on governance principles.
Ensure awareness of governance practices among RPA teams.
Compliance Monitoring:
Monitor compliance with industry regulations and internal policies.
Implement measures to address any compliance gaps.
Effective governance not only safeguards RPA implementations but also enhances their overall impact on organizational objectives.
How do you measure the ROI of an RPA project?
Measuring the Return on Investment (ROI) for an RPA project involves a comprehensive assessment of the costs, benefits, and overall impact. Here are key considerations and methods to measure RPA project ROI:
Cost Analysis:
Identify all costs associated with the RPA implementation.
Include expenses related to software, licensing, development, training, and maintenance.
Benefits Identification:
Quantify the tangible and intangible benefits of RPA.
Tangible benefits may include time savings, reduced errors, and increased efficiency.
Intangible benefits may involve improved customer satisfaction and employee morale.
Time Savings:
Measure the time saved by RPA in executing tasks.
Compare the time taken by bots to complete processes against manual efforts.
Error Reduction:
Assess the reduction in errors achieved through RPA.
Quantify the impact of error reduction on operational efficiency.
Increased Productivity:
Evaluate the overall increase in productivity resulting from automation.
Consider the capacity of RPA to handle repetitive tasks, allowing human resources to focus on more strategic activities.
Operational Efficiency:
Analyze improvements in operational processes facilitated by RPA.
Consider factors such as faster processing, improved accuracy, and streamlined workflows.
Customer Impact:
Measure any positive effects on customer experience.
Factors may include quicker response times, reduced processing delays, and enhanced service quality.
Employee Satisfaction:
Assess the impact of RPA on employee satisfaction.
Consider feedback from employees regarding workload reduction and engagement in more meaningful tasks.
Quantifiable Metrics:
Utilize quantifiable metrics to express benefits in monetary terms.
Calculate the ratio of benefits to costs to derive the ROI percentage.
Periodic Evaluation:
Conduct periodic evaluations to track ongoing ROI.
Adjust calculations based on evolving business needs and changing RPA performance.
Measuring the ROI of an RPA project requires a balanced analysis of both costs and benefits, considering short-term gains and long-term strategic advantages.
How you will Identify Ideal use case for the RPA?
Below are list of factors involve before implementing the any process for the RPA.
Number of FTP and Transaction Volume
Frequency of Process and Percentage of Rules based
Regulatory Risk
ROI value of process
Nature of Process (Is process and data changing frequently Yes / No?)
Meeting SLA and good customer experience
Compacity of the Process.
Business Impact after the Process.
What are the Reasons for RPA Project Failure?
Selection of RPA Tool (OEM): Choosing an RPA tool that does not align with the organization’s requirements or lacks necessary features can hold the success of automation initiatives.
Poor Process Selection: Opting for processes that are not suitable for automation, such as those with frequent changes or lack of standardization, can lead to inefficiencies and setbacks.
Lack of Stakeholder Involvement: Not engaging key stakeholders from various departments in the planning and execution phases can result in a lack of alignment with organizational goals and objectives.
Resistance to Change: Employee resistance to automation due to concerns about job displacement or a lack of understanding of RPA benefits can impede successful implementation.
Inadequate Testing: Insufficient testing of automated processes can lead to errors, inefficiencies, and disruptions in operations, impacting the reliability of the RPA solution.
Lack of Skillset: Inadequate training and skill development for the team responsible for designing, implementing, and maintaining the RPA solution can hinder effective deployment.
No RPI Return on Investment: Failing to establish clear metrics for measuring the return on investment and overall business value from RPA implementations can make it challenging to demonstrate success.
Insufficient Governance: Lack of proper governance and control mechanisms may result in unmanaged or chaotic automation environments, impacting the sustainability of RPA initiatives.
Unrealistic Expectations: Setting expectations that are too ambitious or unrealistic without a clear understanding of RPA capabilities and limitations can lead to disappointment and project failure.
To mitigate these risks, organizations should carefully plan, involve stakeholders, provide adequate training, and approach RPA projects with a realistic understanding of both opportunities and challenges. Regular monitoring, evaluation, and adjustments are also crucial for long-term success
What is the difference between robotic process automation (RPA) and traditional automation?
Traditional Automation
Technology : API are Used
Easy For Integration : Can not be used for wind rang of application due to lack of API availability
Adaptability: Run on old pre-defined code it will not act in new scenarios
Costing: Expensing for long term usage
Robotic process automation (RPA)
Technology : it is used by OS based software application
Easy For Integration : It can be interact with other application by consuming other API or we can create our own custom activities
Adaptability: RPA can learn from data Using AI and performed the task as Human do.
Costing: It is expensive for the short run and good ROI return for the long term.
What is RPA?
In UiPath We have 3 type of Selector for the automation. This selector paly very imported role for automation based on condition.
Full Selector:
Contains a complete set of attributes that uniquely identify an element.
Generally used for reliability and accuracy in identification.
Partial Selector:
Contains only a subset of attributes, offering flexibility.
Suitable when a few attributes are sufficient for accurate identification.
Dynamic Selector:
Contains variables or arguments, making it adaptable to changing attributes.
Ideal for scenarios where elements have dynamic properties. Ref:- UiPath
RPA stands for Robotic Process Automation, You can also be called a software robot that acts as a Human, performing human tasks like logging into applications, sending emails, MIS data massaging, and Copying files from one location to another. In simple a robot performs the automation of process.
What is the Benefit of RPA?
Cost Savings: RPA can perform repetitive and rule-based tasks 24/7 without breaks, leading to significant cost savings compared to human labor.
Increased Accuracy: RPA bots execute tasks with precision, reducing the likelihood of errors that can occur due to human fatigue or oversight.
Efficiency: Automation of routine tasks allows employees to focus on more complex and strategic activities, improving overall efficiency.
Faster Processing: RPA bots can complete tasks at a faster pace than humans, leading to quicker processing times for various business operations.
Scalability: RPA solutions can easily scale up or down based on the volume of work, providing flexibility to adapt to changing business needs.
24/7 Availability: RPA bots can work around the clock, enhancing the speed of task completion and ensuring continuous operations.
Improved Compliance: RPA ensures that processes are executed consistently, reducing the risk of non-compliance with regulations or internal policies.
Enhanced Analytics: By automating data entry and processing, RPA contributes to improved data accuracy, enabling better analytics and decision-making.
Employee Satisfaction: Automation of mundane tasks allows employees to engage in more meaningful and creative work, leading to higher job satisfaction.
Quick Return on Investment (ROI): RPA implementations often result in a rapid return on investment due to the efficiency gains and cost savings achieved.
What are the document created throw out RPA project?
Throughout an RPA project, various documents are created to ensure clarity, documentation, and effective project management. These documents include:
Process Documentation: Detailed documentation of the identified processes, including step-by-step procedures, inputs, and expected outputs.
Project Plan: A comprehensive plan outlining the project scope, objectives, timelines, and resource allocation.
Business Requirements Document (BRD): Clearly defined business requirements that the RPA solution aims to address.
Functional Design Document (FDD): Details about how the RPA solution will meet the specified business requirements, including workflow diagrams and system architecture.
Technical Design Document (TDD): Technical specifications and details, including software components, integrations, and coding standards.
Test Plan: A plan for testing the RPA solution, covering unit testing, integration testing, and user acceptance testing.
Training Documentation: Materials for training end-users and stakeholders on how to interact with the RPA system.
Deployment Plan: A detailed plan outlining how the RPA solution will be deployed into the live environment.
Monitoring and Maintenance Documentation: Guidelines and procedures for ongoing monitoring, maintenance, and support of the RPA solution.
Change Management Documentation: A strategy for handling changes, updates, or modifications to the RPA solution post-deployment.
These documents collectively ensure transparency, facilitate collaboration, and contribute to the success of the RPA project.
What is Different between Front Office and Back Office Bots?
Front-Office Bots:
Explanation: Front-office bots are designed to automate tasks that directly interact with customers or external stakeholders.
Examples: Chatbots for customer support, automated response systems, and virtual assistants.
Additional Information: Front-office bots usually require human intervention, operating on the user’s desktop machine, and their source code is stored on the same machine.
Back-Office Bots:
Explanation: Back-office bots focus on automating internal, behind-the-scenes tasks that are essential for organizational operations.
Examples: Data entry, invoice processing, payroll automation, and inventory management.
Additional Information: Back-office bots operate without the need for human intervention, leveraging UiPath Orchestrator for initialization. The source code is centrally located at Orchestrator when published.
Please Explain list of data type and argument supported by UiPath?
UiPath Support below type of data type and 3 type of argument below are the below are the details.
Boolean: Represents true or false values.
Int32: Represents 32-bit signed integers.
Int64: Represents 64-bit signed integers.
String: Represents sequences of characters.
Char: Represents a single character.
DateTime: Represents date and time values.
Double: Represents 64-bit floating-point numbers.
Array: Represents an ordered collection of values.
Object: Represents a generic object.
GenericValue: Represents a value that can have any data type.
Data table: Store the data in data table format as object.
Argument types in UiPath include:
In: Used for passing values into the workflow.
Out: Used for passing values out of the workflow.
InOut: Used for bidirectional data flow.
Directionless: Used for variables that store data between workflow calls.
These data types and argument types are essential for managing and manipulating data within UiPath workflows.
Difference between Array, List & Enumeration?
Below are the difference between Array, List and Enumeration?
Property
Array
List
Enumeration
Definition
Fixed-size, ordered collection
Dynamic, resizable collection
Distinct type with named constant values
Mutability
Fixed size (immutable)
Dynamic size (mutable)
Typically immutable
Accessing Elements
Accessed by index
Accessed by index
Accessed by symbolic name
Type
Elements must be of the same type
Elements must be of the same type
Represents a set of related values
This table provides a concise comparison of the key properties of arrays, lists, and enumerations.
What are activities properties in UiPath?
activities properties in UiPath
Below are the activity and property details which was used most common in development. like Click, Get Text, Element Exists and type into.
Below are the activity table list:
Activity
Property Name
Description
Example Value
Explanation
Where to Use
Click
ContinueOnError
Continue on Error
False
Continue execution on error
Handling situations where a click may fail
DelayAfter
Delay After (ms)
500
Pause after the click
Allow time for a page to load after a click
DelayBefore
Delay Before (ms)
300
Pause before the click
Allow time for the element to become ready
SimulateClick
Simulate Click
True
Simulate the click operation
Useful for background automation
Get Text
ContinueOnError
Continue on Error
True
Continue execution on error
Proceed with the workflow even if text retrieval fails
DelayBefore
Delay Before (ms)
200
Pause before getting text
Allow time for the element to become ready
Output
Output Variable
textOutput
Store the retrieved text
Use the text in subsequent steps or store it in a variable
Element Exists
ContinueOnError
Continue on Error
False
Continue execution on error
Check if an element exists and take action accordingly
TimeoutMS
Timeout (ms)
5000
Maximum time to wait for the element
Adjust based on expected wait time for an element
WaitForReady
Wait For Ready
COMPLETE
Define when the element is ready
Adjust based on the specific application’s responsiveness
Type Into
ContinueOnError
Continue on Error
True
Continue execution on error
Proceed with the workflow even if typing fails
DelayBefore
Delay Before (ms)
100
Pause before typing
Allow time for the element to become ready
SimulateType
Simulate Type
False
Simulate the typing operation
May not work with all types of text fields
What is Selector & types of selectors?
In UiPath We have 3 type of Selector for the automation. This selector paly very imported role for automation based on condition.
Full Selector:
Contains a complete set of attributes that uniquely identify an element.
Generally used for reliability and accuracy in identification.
Partial Selector:
Contains only a subset of attributes, offering flexibility.
Suitable when a few attributes are sufficient for accurate identification.
Dynamic Selector:
Contains variables or arguments, making it adaptable to changing attributes.
Ideal for scenarios where elements have dynamic properties.
What is UiPath?
UiPath Interview Questions and answers
UiPath is a leading Robotic Process Automation (RPA) software platform that enables organizations to automate repetitive tasks, streamline workflows, and increase operational efficiency. It provides a user-friendly interface and a wide range of tools to automate business processes without the need for extensive programming knowledge.
Key features of UiPath include:
Robust Automation Capabilities
Drag-and-Drop Interface
Scalability
AI and Machine Learning Integration
Robust Security
Overall, UiPath empowers organizations to accelerate digital transformation initiatives, improve productivity, reduce errors, and achieve significant cost savings by automating repetitive and manual tasks across their business processes.
Why is UiPath better than other RPA tools?
UiPath is recommended for RPA due to its user-friendly interface, scalability, and robust features. Compared to Automation Anywhere (AA) and Power Automate, UiPath has distinct advantages:
Custom Activity connecter UiPath Allow us to create the custom activity which give us freedom to create connecter and Connect to any Systems by creating NuGet packages.
Dot Net framework / Flexibility on coding: UiPath allow us to write the code in C#, vb.net which allow us use the native code access.
Module Development: UiPath allow us to develop the project module wise and reuse this later stage.
Test / AI / OCR: UiPath give us more advantage handling the complex solution by providing feature of AI, Document Understanding, Testing solution and many more.
User-Friendly Interface: UiPath provides a more intuitive and easy-to-use interface, making it accessible for both developers and non-developers.
Enhancement : UiPath provide scalability, allowing organizations to efficiently scale automation initiatives from small projects to enterprise-level implementations.
Robust Features: UiPath boasts a comprehensive set of features, including advanced automation capabilities, integrations, and a thriving community for support and resources.
the above factors make UiPath a preferred choice over other RPA tools. ensuring a smoother automation journey with enhanced usability, scalability, and feature richness compared to AA and Power Automation.
Write down the main features of the UiPath tool.
UiPath empowers users to automate a wide range of tasks and processes with its intuitive features and robust capabilities. Here’s a breakdown of the key benefits UiPath offers:
Effortless Workflow Creation: The visual drag-and-drop interface in UiPath Studio makes automation accessible to everyone, regardless of technical background. Build workflows by simply dragging and dropping pre-built activities, eliminating the need for complex coding.
Versatile Automation Solutions: UiPath tackles automation across various environments. Automate tasks on desktops, web applications, and even Citrix environments, ensuring comprehensive automation coverage for your needs.
Simplified Automation Development: Leverage the power of recording. Capture user actions on desktops, web apps, or Citrix with ease. UiPath then transforms these recordings into automation scripts that you can refine and customize for a smooth transition to automation.
Modular Design for Maintainability: Promote reusability by creating reusable components and libraries. This modular approach simplifies automation design, maintenance, and future modifications.
Scalable Enterprise Automation: UiPath Orchestrator, the web-based management platform, provides centralized control for large-scale deployments. Manage robots (automation executors) across machines, schedule workflows, monitor robot performance, and track automation success – all from a single platform.
Robust Error Handling: UiPath safeguards your automations with robust exception handling. Define error-handling routines to gracefully manage unexpected situations during execution, preventing crashes and ensuring smooth operation.
Streamlined Integrations: UiPath seamlessly integrates with various third-party applications, databases, and APIs. This connectivity empowers you to automate complex end-to-end business processes that involve data exchange across multiple platforms.
Prioritized Security: UiPath takes data security and compliance seriously. Features like role-based access control, encryption, and audit trails ensure data integrity and confidentiality throughout the automation lifecycle.
Data-Driven Optimization: UiPath’s analytics and reporting tools provide valuable insights into automation performance. Monitor, analyze, and optimize your automation processes to continuously improve efficiency and extract maximum value.
Empowering Citizen Developers: UiPath fosters a culture of citizen development with low-code capabilities. Business users with minimal programming knowledge can contribute to automation initiatives, expanding automation reach across the organization.
AI and Machine Learning Potential: UiPath integrates with AI and machine learning technologies, opening doors to advanced automation scenarios. This paves the way for intelligent automation that can handle complex tasks and adapt to changing circumstances.
What does the term 'UiPath Automation' mean?
UiPath Automation is a way to automate repetitive tasks on your computer using software robots. These robots are built using UiPath, a popular Robotic Process Automation (RPA) platform.
Robotic Process Automation (RPA): Imagine having tireless, digital helpers for your computer work. RPA lets you create software robots (bots) that can mimic human actions. These bots can:
Copy and paste data
Fill out forms
Move files between folders
Send emails
And more!
UiPath: UiPath is like a toolbox for building and managing these helpful robots. It provides a user-friendly interface so you don’t need to be a programming expert. UiPath also offers pre-built components and features like screen recognition to make automation easier.
By using UiPath Automation, you can:
Save Time: Free yourself from repetitive tasks, letting the robots handle them.
Boost Accuracy: Robots don’t get tired or make mistakes like humans can.
Focus on Important Work: Spend more time on creative and strategic tasks.
In short, UiPath Automation helps you work smarter, not harder, by automating repetitive tasks on your computer.
What is the main difference between Process Automation and Test Automation?
RPA vs. Test Automation: Automating for Different Reasons
Both RPA and test automation involve using software to automate tasks, but they have different goals:
RPA (Robotic Process Automation): Imagine having tireless robot helpers for your computer work! RPA lets you create software robots (bots) that mimic how you do things on your computer. These bots can handle repetitive tasks in various areas like accounting, data entry, or filling out forms. This frees you up to focus on more creative or strategic work.
Test Automation: This is all about making sure computer programs work properly. Testers create automated tests that run the program through its paces, like checking if buttons work or if data is entered correctly. This helps find bugs and ensure the program is high quality.
Here’s a table to see the key differences:
Feature
RPA (Process Automation)
Test Automation
Goal
Streamline business processes
Ensure software quality
Focus
Repetitive tasks across applications
Testing specific software features
Example
Automating data entry in a spreadsheet
Checking if a website login works
In short, RPA automates repetitive tasks you do on your computer, while test automation makes sure new programs work as expected. Both can be very helpful tools!
How is UiPath different from Selenium?
UiPath vs Selenium: A Head-to-Head Comparison
Feature
UiPath (RPA)
Selenium (Web Automation Testing)
Purpose
Automates repetitive tasks across business processes (data entry, form filling, file management)
Automates tests of web applications (login functionality, button clicks, data validation)
Technical Expertise
Easier to use, visual interface with drag-and-drop functionality
Requires programming knowledge (typically Python or Java) to write test scripts
Scope of Automation
Broader – desktops, web browsers, Citrix environments
Primarily web browsers (may require additional tools for other applications)
Deployment & Management
Centralized platform (UiPath Orchestrator) for deploying and monitoring robots (automation executors)
Requires integration with frameworks and tools for managing and running tests
Coding Requirements
Low-code/no-code possible for basic tasks
Coding required
Learning Curve
Easier to learn due to the visual interface
Steeper learning curve due to programming requirements
Suited for
Non-technical users, automating various repetitive tasks
Testers, developers, automating web application tests
Analogy
Versatile robot assistant for various office tasks
Specialized tool for checking website functionality
This table provides a concise overview of the key differences between UiPath and Selenium across various aspects such as purpose, user interface, application support, deployment environment, integration, and skill requirements.
What are the main applications of UiPath?
Here’s a breakdown of how UiPath automates tasks across various industries, making it a valuable tool for businesses:
Finance and Banking:
Imagine an assistant robot sorting through piles of paperwork (data entry) and updating bank accounts automatically (transaction processing).
UiPath can also handle reports for regulators (compliance) and answer basic customer questions (customer service).
Healthcare:
UiPath can be like a super-efficient receptionist, handling patient check-in (registration), appointments, and insurance claims (processing). It can even manage bills and keep track of supplies (inventory management).
Insurance:
Repetitive tasks like setting up new policies, processing claims, and checking applications (underwriting) can all be automated with UiPath. This frees up insurance agents to focus on providing better customer service.
Manufacturing:
UiPath can be like a tireless worker on the factory floor, keeping track of parts (inventory management), managing deliveries (supply chain), and ensuring quality (control checks). It can even monitor production lines for smooth operation.
Retail and E-commerce:
UiPath helps stores keep track of what’s on the shelves (inventory tracking) and get your orders to you quickly (order fulfillment). It can also answer customer questions and update prices automatically.
Human Resources (HR):
UiPath can streamline HR tasks like hiring new employees (recruitment), processing payroll, and managing leaves. This allows HR professionals to focus on employee development and support.
Telecommunications:
Imagine a robot assistant handling your phone bill (customer billing), connecting new services (provisioning), and fixing any network issues (fault resolution). UiPath helps keep things running smoothly for telecommunication companies.
Public Sector:
UiPath can help government agencies serve citizens more efficiently. It can automate tasks like processing permits, managing documents, and handling back-office operations.
Education:
UiPath can free up teachers and staff from paperwork. It can handle student enrollment, grading, and scheduling, allowing educators to focus on teaching and student support.
Utilities:
UiPath can be like a remote meter reader, automatically collecting data (meter reading) and sending you your bill (billing). It can also help manage outages, maintain equipment (asset maintenance), and answer customer inquiries.
By automating these tasks, UiPath helps businesses save time, reduce errors, and improve efficiency across all departments. This is a powerful tool that can benefit organizations of all sizes and industries.
Explain UiPath Architecture.
UiPath’s architecture facilitates the design, deployment, and management of RPA solutions. It operates across three distinct layers:
1. Client Layer:
UiPath Studio: This development environment offers a visual interface for building automation workflows. It provides pre-built activities (functions) that can be dragged and dropped to construct automation logic. Developers leverage Studio to design workflows that interact with various applications and data sources.
UiPath Robot: These software agents execute the workflows created in Studio. Robots are deployed on individual machines or virtual machines and interact with target systems using APIs, user interface (UI) automation techniques, or a combination of both.
Browser Components: These optional components enable web automation capabilities within workflows. They allow robots to interact with web elements within browser windows, mimicking user actions for web-based applications.
2. Server Layer:
UiPath Orchestrator: This web-based platform acts as the central control unit for managing and monitoring robots. Orchestrator offers functionalities like:
Robot Management: Provisioning, configuration, and lifecycle management of robots.
Workflow Deployment and Scheduling: Deploying workflows to robots and scheduling their execution based on defined triggers or timers.
Monitoring and Logging: Provides real-time and historical insights into robot performance, workflow execution status, and potential errors.
Security and User Management: Role-based access control and user authentication for secure access to automation resources.
3. Persistency Layer:
Databases: These relational databases store critical information related to UiPath operations, including:
Workflow Definitions: The logic and activities comprising each automation workflow.
Robot Configuration: Settings and properties associated with individual robots.
Execution Logs: Detailed records of robot activity, including timestamps, execution statuses, and any encountered errors.
Asset Management: Metadata and versioning information for reusable components and libraries within workflows.
Authentication Services: These services manage user access and permissions within the UiPath platform, ensuring only authorized users can create, manage, or execute automations.
Deployment Modes:
UiPath offers two primary deployment configurations:
Single-node: This configuration is suitable for development and testing environments. It involves a single server installation encompassing all UiPath components (Studio, Orchestrator, Robot, and database).
Multi-node (High Availability): This architecture is recommended for production environments. It utilizes multiple server nodes distributed across a network, often behind a load balancer for redundancy and scalability. This ensures high availability (HA), meaning the automation system remains operational even in case of server failure.
This layered architecture empowers organizations to automate various business processes using UiPath. The visual design environment, centralized management platform, and secure data storage enable efficient development, deployment, and monitoring of RPA solutions.
What is the difference between screen scraping and data scraping in UiPath?
Screen scraping and data scraping in UiPath
In UiPath, both screen scraping and data scraping aim to extract information from your computer screen, but they differ in their focus and output:
Screen Scraping:
Focus: Extracts the entire visual content of a specific region on the screen, including text, images, and formatting.
Output: Provides the scraped content as a raw string value or an image.
Use Cases: Useful for scenarios where you need to capture the complete visual representation of an element, like:
Extracting text from a non-editable PDF document.
Capturing screenshots for comparison or documentation purposes.
UiPath Activities: Uses activities like Get Full Text, Get Visible Text, or Get OCR Text depending on the element type (text, visible element, or image).
Data Scraping:
Focus: Extracts structured data from a specific source, typically a table or a web page with a predictable layout.
Output: Organizes the extracted data into a structured format like a DataTable within UiPath. This makes it easier to manipulate and use the data in subsequent automation steps.
Use Cases: Ideal for extracting data from tables in applications, websites, or reports for further analysis or processing.
UiPath Activities: Primarily uses the UiPath.Web.Activities.ExtractDataTable activity to scrape data from web tables or the UiPath.Excel.Activities.Read Range activity for data extraction from Excel spreadsheets.
Here’s a table summarizing the key differences:
Feature
Screen Scraping
Data Scraping
Focus
Entire visual content
Structured data extraction
Output
Raw string value or image
DataTable (structured format)
Use Cases
Capturing complete visual elements
Extracting data for processing
UiPath Activities
Get Full Text, Get Visible Text, Get OCR Text
ExtractDataTable, Read Range
Analogy:
Imagine a newspaper. Screen scraping is like taking a picture of the entire page, capturing everything you see. Data scraping is like carefully reading a table in the newspaper and extracting specific information like stock prices into a list.
Define Citrix Automation.
Conquering Citrix Challenges: Automation with UiPath
UiPath empowers organizations to automate tasks within virtualized environments like Citrix Virtual Desktops (CVDs) and other Citrix offerings. This capability, known as Citrix Automation, tackles a common challenge: traditional automation methods often struggle to interact with elements within Citrix due to its virtual nature.
UiPath’s Solution: A Two-Pronged Approach
UiPath offers a robust solution for Citrix Automation, providing two primary approaches:
UiPath Citrix Extension: These activities allow users to interact with elements within Citrix windows just like they would with desktop applications. It’s a familiar and efficient way to automate tasks within Citrix.
UiPath Computer Vision (CV): Image recognition and computer vision to identify elements directly on the screen, regardless of the underlying environment. This proves particularly valuable for Citrix automation scenarios where traditional UI element identification methods might not work reliably due to Citrix’s virtualized nature.
Unlocking the Benefits of Citrix Automation
By incorporating Citrix Automation into your workflows, you can reap several benefits:
Enhanced Efficiency: Free up your human workforce from repetitive tasks within Citrix applications and empower them to focus on more strategic activities.
Reduced Errors: Automation minimizes errors compared to manual processes, leading to greater accuracy and consistency.
Boosted Productivity: Streamlining workflows involving Citrix applications results in faster turnaround times and improved overall productivity.
Unwavering Consistency: Automation ensures tasks within Citrix environments are executed consistently, eliminating human error and deviation.
Real-World Applications of Citrix Automation
Here are some examples of how organizations leverage Citrix Automation to improve efficiency and productivity:
Automating data entry in Citrix-based customer relationship management (CRM) systems.
Streamlining invoice and document processing within Citrix financial applications.
Automating order fulfillment tasks in Citrix-based inventory management systems.
Extracting data from reports generated in Citrix environments for further analysis.
How is UiPath different from Blue Prism?
Here’s a table outlining the key differences between UiPath and Blue Prism, two leading Robotic Process Automation (RPA) platforms:
Feature
UiPath
Blue Prism
Focus
General-purpose RPA, caters to both front and back-office automation
Primarily back-office automation, strong in regulated industries
Deployment
Web-based deployment, on-premise option available
Client-server architecture, on-premise deployment only
Development Environment
More user-friendly visual interface (Studio)
Script-based development environment
Technical Skills
Lower barrier to entry, requires basic coding knowledge
Requires developers with stronger programming skills
Scalability
Highly scalable, supports large deployments
Good scalability, but may require more resources for complex processes
Cost
Generally more cost-effective, flexible pricing options
Extensive integrations with various third-party tools and platforms
Good integrations, but not as extensive as UiPath
Target Users
Ideal for businesses of all sizes, caters to both developers and citizen developers
Primarily suited for large enterprises, focus on IT developers
Additional Points:
Reliability: Both platforms are known for high reliability, but UiPath users may report slightly more frequent issues.
Mobile Accessibility: UiPath offers mobile access to robots, while Blue Prism does not.
Choosing Between UiPath and Blue Prism:
The best platform for you depends on your specific needs. Here’s a quick guide:
Choose UiPath if:
You need a user-friendly platform for both front and back-office automation.
You have a limited budget and require flexible pricing options.
You have a mix of developers and citizen developers.
You value extensive third-party integrations and mobile accessibility.
Choose Blue Prism if:
You are a large enterprise with a focus on regulated industries and back-office automation.
You have a team of experienced developers comfortable with scripting languages.
You prioritize on-premise deployment and a strong focus on security.
Remember: This table provides a general overview. It’s always best to evaluate both platforms based on your specific requirements and conduct a proof-of-concept before making a decision.
What are the arguments?
UiPath arguments allow you to pass data between workflows and enhance automation reusability. Here’s a breakdown of their types and usage in a table:
Argument Direction
Description
Use Case Example
In Argument
Passes data from a calling workflow to a called workflow.
A workflow calculating employee salaries might receive an “In” argument containing employee IDs from a separate workflow fetching employee data.
Out Argument
Passes data back from a called workflow to a calling workflow.
A workflow generating reports might use an “Out Argument” to return the generated report data to the calling workflow for further processing.
In/Out Argument
Can be used for both passing data in and receiving data out from a called workflow.
A workflow updating customer information might receive customer details as an “In/Out Argument” and update the information within the workflow, returning the updated details back to the calling workflow.
Additional Notes:
Arguments can be of various data types, including strings, numbers, booleans, arrays, and data tables.
You define arguments within the workflow properties section of UiPath Studio.
Arguments are essential for creating modular and reusable workflows in UiPath.
Using arguments promotes better code organization and simplifies complex automation processes.
Benefits of Using Arguments:
Improved Reusability: Workflows can be reused with different data sets by passing arguments.
Enhanced Code Maintainability: Code becomes more modular and easier to understand by separating data from workflow logic.
Reduced Redundancy: Eliminates the need to duplicate data processing logic across multiple workflows.
Increased Flexibility: Arguments allow workflows to adapt to different input and output requirements.
Define session variables.
In UiPath, session variables are temporary data containers that store information specific to a single automation session or workflow execution. They differ from environment variables in terms of scope and persistence. Here’s a breakdown:
Session Variables:
Scope:Limited to the duration of a single workflow execution (session).
Persistence: Values are destroyed once the workflow execution finishes or encounters an error.
Purpose: Used to store temporary data that needs to be shared across different activities within the same workflow.
Example: A workflow processing customer orders might use a session variable to temporarily store the current order ID for subsequent activities.
Environment Variables:
Scope: Accessible across all workflows within a UiPath Robot or Orchestrator instance.
Persistence: Values persist until explicitly changed or the Robot/Orchestrator is restarted.
Purpose: Used to store global configuration data or information that needs to be shared across multiple workflows.
Example: A username or API key used by multiple workflows can be stored as an environment variable for easy access and management.
Key Differences Table:
Feature
Session Variables
Environment Variables
Scope
Single workflow execution
All workflows within a Robot/Orchestrator
Persistence
Destroyed after workflow finishes
Persist until changed or restart
Purpose
Temporary data sharing within workflow
Global configuration or shared data
Here’s an analogy to understand the difference:
Think of a bakery.
Session Variables: Like a notepad used by a baker during a single baking session to track ingredients needed for each cake (specific workflow). The notepad is discarded after the baking session is complete.
Environment Variables: Like the bakery’s recipe book containing standard measurements for different ingredients (global configuration data). This recipe book is used by all bakers and persists across baking sessions.
Tips for Using Session Variables:
Use session variables for temporary data specific to a workflow execution.
Avoid overloading workflows with too many session variables.
Consider using environment variables for data needed across multiple workflows.
Use clear and descriptive names for your session variables.
Explain the generic variable.
Here’s a table explaining generic variables in UiPath:
Feature
Description
Purpose
Stores data of various types within your UiPath automations.
Data Type
Generic – Can hold text (strings), numbers (integers, decimals), dates and times, arrays, data tables, booleans.
Type Conversion
UiPath automatically attempts to convert the value to the appropriate data type based on the context during use.
Example
A generic variable myData can store a customer name (string), order number (integer), or invoice date (date)
Benefits
* Enhanced Flexibility: Eliminates creating separate variables for different data types.
* Improved Code Readability: Makes code more concise and easier to understand.
* Reduced Redundancy: Eliminates duplicating data processing logic across activities.
Considerations
* Potential Type Conversion Errors: Automatic conversions might not always work flawlessly. Thorough testing is crucial.
* Clarity and Documentation: Use descriptive names and consider documenting the expected data type for better maintainability.
What is the role of properties in UiPath?
A generic variable in UiPath is a versatile data container that can hold various data types within your automations.It offers flexibility and simplifies data handling, making it a valuable tool for UiPath developers.
Here’s a breakdown of key aspects of generic variables:
Data Type Agnostic: Unlike standard variables with predefined data types (string, integer, etc.), generic variables can store any type of data, including:
Text (strings)
Numbers (integers, decimals)
Dates and times
Arrays (collections of data)
Data tables (structured data)
Booleans (true/false values)
Automatic Type Conversion:
When using a generic variable in expressions or activities, UiPath automatically attempts to convert its value to the appropriate data type based on the context.
For example, adding a generic variable containing a number to another number will automatically convert it to a number for the calculation.
However, it’s important to note that conversions might not always be successful, so proper planning is essential.
Benefits of Using Generic Variables:
Enhanced Flexibility:Simplifies data handling by eliminating the need to create separate variables for different data types.
Improved Code Readability: Makes code more concise and easier to understand, as data type is not explicitly declared.
Reduced Errors: Automatic type conversion can streamline development by handling some data type mismatches, but careful planning is still necessary.
Use Cases for Generic Variables:
Storing Dynamic Data: When the data type might vary during automation execution, a generic variable is ideal.
Passing Data Between Activities:Generic variables can be used to pass data of unknown type between different activities within a workflow.Working with External Data Sources: When interacting with external sources that provide data in various formats, a generic variable can handle the retrieved data regardless of its type.
Explain Flow Switch in the context of UiPath.
A Flow Switch activity in UiPath acts like a multi-directional decision point within your workflows.
It evaluates a specified expression and directs the workflow execution based on the result, allowing for branching into different paths.
Functionality:
Expression Evaluation: The Flow Switch activity takes an expression as input. This expression can be any valid UiPath expression that evaluates to a specific value (e.g., string, integer).
Matching Cases: You define a set of cases within the Flow Switch activity. Each case consists of a key and an activity. The key represents a specific value that the expression might evaluate to.
Branching Execution: Once the expression is evaluated, the Flow Switch compares the result with the keys defined in each case. If a match is found, the corresponding activity linked to that case is executed.
Benefits of Using Flow Switch:
Conditional Branching: Enables you to create workflows with multiple decision points and execute specific activities based on different conditions.
Improved Readability: Offers a clearer way to represent conditional logic compared to nested If statements.
Modular Design: Promotes modular code by separating decision-making from activity execution.
Flow Switch is a valuable activity in UiPath for creating robust workflows with conditional branching logic. By effectively utilizing Flow Switch, you can make your automations more adaptable and efficient.
What does Branching mean?
Dividing workflow execution: Your automation takes different paths based on conditions.
Conditional statements: “If” statements or expressions decide which path to follow.
Multiple paths: Each path has activities that execute only if its condition is met.
What is the function of sequence activity in UiPath?
Logical Grouping: The Sequence groups related activities, fostering a clear and organized workflow structure. Think of it as a container for your automation steps, ensuring a logical flow from one activity to the next.
Improved Workflow Management:
Space Optimization: Sequences help declutter your workspace. By grouping activities within a Sequence, you can collapse it, minimizing clutter in the UiPath Designer panel.
Easy Navigation: Moving multiple activities becomes a breeze. Simply relocate the entire Sequence instead of handling each activity individually.
Streamlined Execution and Reusability:
Predictable Execution: Activities within a Sequence execute sequentially, from top to bottom. This simplifies debugging as you can track each step’s execution.
Reusability Powerhouse: Sequences are reusable gold. They can function as standalone automations or seamlessly integrate into more complex workflows (like state machines or flowcharts).
By leveraging these functionalities, Sequence activities become essential tools for building well-structured, maintainable, and reusable UiPath automations.
Explain exception handling and its main options.
Benefits:
Unstoppable Bots: Errors won’t halt your workflows.
Reliable Work: Your automations handle unexpected issues.
Easy Debugging: Exception details help you fix problems.
Key Options:
Try Catch: Wrap risky activities. If an error occurs, define actions (like logging or retrying).
Rethrow: Send errors up the workflow for centralized handling.
Throw: Create custom errors in your automation logic.
Error Handling Activity: Powerful tool for retries and error-based branching.
Best Use:
Try Catch: For potential errors in specific activities.
Rethrow: Escalate errors to a higher level.
Throw: Create custom errors for specific conditions.
Error Handling Activity: For complex scenarios.
With exception handling and testing, your UiPath automations will be strong and reliable!
What are the types of recording options present in the UiPath tool?
UiPath Recording Options:
Basic: Perfect for simple tasks with minimal steps. Captures basic clicks and keystrokes.
Desktop: The go-to option for most automations. Records interactions with applications, windows, and even the desktop itself, ideal for broader workflows.
Web: Built for web browsers. Captures actions like clicking links, filling forms, and navigating pages, perfect for automating web-based tasks.
What is the role of debugging?
The role of debugging in UiPath, as in any software development or automation process, is crucial for identifying and resolving issues or errors within automation workflows.
Identifying Errors: Debugging empowers developers to step through workflows, observing activity behavior and variable values in real-time to pinpoint errors (bugs) with laser focus.
Troubleshooting: When an automation malfunctions, debugging dives deep, uncovering the root cause of the issue. Developers can inspect variables, execution paths, and system interactions to understand why the automation went off course.
Pre-Deployment Validation: Before launch, debugging acts as a pre-flight check, allowing developers to validate the automation’s logic and ensure flawless performance under diverse conditions.
Iterative Development: Debugging fuels an iterative development process. Developers can make incremental changes to the workflow, swiftly debug them, and verify the results. This rapid feedback loop enables continuous refinement and improvement of your automation.
Error Resolution:Once an issue is identified during debugging, developers can transform into error slayers. They can adjust activity properties, modify workflow logic, or implement exception handling to ensure the automation executes flawlessly.
Enhancing Robustness: Through debugging, developers can identify potential failure points, fortify workflows with error handling mechanisms, and optimize them for peak performance and reliability. This transforms your automation into a robust fortress against failure.
These changes maintain the core information but use more engaging language and emphasize the problem-solving nature of debugging.
Explain the variables and data types.
In UiPath, variables act as your automation’s data workhorses. But unlike real horses, these are data chameleons, capable of adapting to different types of information. Let’s explore the various data types you can leverage to manage your automation’s data effectively:
Text Wranglers (String): These variables specialize in handling textual information like names, addresses, or any sequence of characters. Think of them as name tags for your data. Remember, everything you store in a text variable needs quotation marks, just like a proper label.
Decision Makers (Boolean): Ever need your automation to make a choice? Booleans are your go-to variables. They hold only two values: true or false. Perfect for branching your workflow based on specific conditions. Imagine a coin toss – one side heads (true), the other tails (false). Booleans bring that clear-cut decision-making power to your automations.
All-Rounders (GenericValue): Need a variable that can adapt on the fly? GenericValue variables are your Swiss Army Knives. They can store text, numbers, dates, even arrays – all in one place! UiPath automatically converts the data type as needed, making them ideal for handling unpredictable or dynamic data.
Beyond the Basics: A Peek into Other Data Types
While the three above are common data types, UiPath offers a wider toolbox:
Number Crunchers (Integer): These variables specialize in storing whole numbers, like product quantities or order counts. They ensure your calculations stay precise, just like a trusty calculator.
Object Jugglers: Object variables are versatile containers that can hold any kind of data, like a magic box in your automation. Use them when you’re unsure about the specific data type beforehand.
Spreadsheet Mimics (Data Table): Need to manage complex datasets? Data tables are your answer. Imagine a miniature spreadsheet within your automation, allowing you to organize large amounts of data in rows and columns for efficient manipulation.
Time Travelers (Date and Time): Working with dates and times? These specialized variables ensure your automation can handle specific dates or times, keeping your workflows temporally accurate.
By understanding these data types and using them effectively, you can build robust UiPath automations that can manage diverse data needs. Remember, choosing the right data type is like selecting the perfect tool for the job – it ensures efficiency and accuracy in your automations.
Why do we use flowchart activities in UiPath?
Flowcharts shine in UiPath for two key reasons:
Visualization Powerhouse: They provide a clear visual map of your automation’s logic, making them ideal for complex workflows, collaboration, and easier troubleshooting.
Decision-Making Maestro: Flowcharts excel at handling choices and branching within your automation. You can define different execution paths based on conditions, making your automation adaptable to various scenarios.
In essence, flowcharts offer a powerful way to design, document, and execute complex workflows with branching logic and error handling capabilities.
Why the term 'assign activity' is used in UiPath?
The term “assign activity” in UiPath is used for a very specific reason: it clearly conveys the action taking place within the activity. Here’s a breakdown:
Assign: This term directly indicates the core function – assigning a value to something. In UiPath, you’re assigning a value (data) to a variable.
Activity: This signifies that “assign” is not just a general concept, but a specific action you can perform within the UiPath Studio environment. It’s a building block for your automations.
Here’s why this terminology is effective:
Clarity: It leaves no room for misunderstanding. You immediately know what the activity does – it assigns a value.
Action-Oriented: The term “activity” emphasizes that it’s a practical tool you can use to manipulate data within your workflows.
Consistency: It aligns with the naming convention of other UiPath activities, promoting a logical and predictable user experience.
Overall, “assign activity” efficiently communicates the purpose of the activity, making it easy for UiPath users to understand and utilize it effectively in their automations.
What are the steps to handle the credentials in UiPath?
Here are the common steps to handle credentials in UiPath:
1. Choosing a Storage Method:
Windows Credential Manager: This is the simplest option for attended automations running on the same machine as the user. It stores credentials securely within the Windows operating system.
UiPath Orchestrator Assets: For more centralized management and access control, especially for unattended robots, store credentials as Assets within UiPath Orchestrator. This offers features like versioning and encryption.
Config Files: For storing basic credentials in a text file, use config files. However, this method is less secure and not recommended for sensitive information.
Arguments: You can pass credentials as arguments when launching the automation, but avoid this for sensitive data due to visibility in process logs.
2. Securely Storing Credentials:
Never store plain text passwords. Use secure methods like encryption before storing them in any location.
Minimize credential exposure. Avoid passing credentials throughout your workflow if possible.
3. Using Activities to Manage Credentials:
Add Credential: Creates a new credential entry in the chosen storage method (e.g., Windows Credential Manager or Orchestrator Assets).
Get Credential: Retrieves existing credential details from the chosen storage method.
Get Password: Retrieves the password securely from a stored credential (avoid using this activity if possible due to potential exposure in the workflow).
4. Integrating Credentials into Workflows:
Use the retrieved credential values (username and password) within activities that require authentication, such as “Type Into” or “Navigate To.”
5. Best Practices:
Minimize credential storage: Store credentials only when necessary.
Rotate credentials regularly: Update passwords periodically to enhance security.
Grant least privilege: Assign only the necessary permissions to the credentials used in your automation.
By following these steps and best practices, you can securely manage credentials within your UiPath automations. Remember, prioritizing security is crucial when handling sensitive information.
What is meant by the Package manager in UiPath?
In UiPath, the Package Manager acts as a central hub for managing the various software components your automations rely on. These components are called “activities” and are grouped together into packages. Here’s a breakdown of the Package Manager’s functionality:
Activity Download and Installation: It allows you to browse, search for, and download activity packages from various sources, including UiPath’s official feed and custom feeds hosted by your organization. Once downloaded, these packages provide you with the specific activities you need to perform various tasks within your automations.
Package Management: The Package Manager doesn’t just download packages; it also helps you manage them effectively. You can view a list of installed packages, check their versions, update them to newer versions if available, or even uninstall packages you no longer require. This ensures your automations leverage the latest and most compatible activities.
Dependency Management: When you download a package, the Package Manager automatically takes care of any dependencies. Dependencies are other packages that the downloaded package might rely on to function correctly. The Package Manager ensures all necessary dependencies are also downloaded and installed, preventing errors due to missing activities.
Centralized Control: By managing activities through the Package Manager, you maintain a central repository of reusable components. This promotes consistency across automations within your organization and simplifies collaboration, as everyone can access and utilize the same set of activities.
In essence, the Package Manager streamlines the process of acquiring and managing the building blocks your UiPath automations need to function. It ensures you have the right tools (activities) for the job and keeps them up-to-date, promoting efficiency and reliability in your automation development process.
Why do we use break activity?
UiPath’s Break activity is your loop escape hatch. It lets you exit the current loop iteration (For Each, While, Do While) early. This is useful for:
Finding specific data – stop looping once you find what you need.
Handling errors – break out if an error occurs to prevent further issues.
Performance optimization – reduce processing time by exiting loops early.
Use Break strategically to improve loop control and code clarity, but avoid overuse to maintain readability.
Why do we use 'do while' activity?
UiPath’s Do While loop ensures the loop body executes at least once, no matter the initial condition. This is handy for situations where an initial action is crucial, even if the loop might not continue afterwards. Think data validation or processing file data where you need to read at least once before checking if there’s more to process.
Why do we use the If activity?
The If activity is your go-to for building conditional logic in UiPath. It lets you make choices based on conditions (true/false) and execute different actions accordingly.
If activity
Think of it this way: You’re automating loan approvals. Use an If activity to check if the credit score meets the minimum requirement:
Condition: Credit score >= minimum (e.g., >= 650)
True: Approve the loan (display success message or send approval email).
False: Reject the loan (display rejection message or send notification).
With the If activity, your automations become adaptable and can respond to different scenarios!
What is the use of For Each activity?
The For Each activity is your workhorse for repetitive tasks in UiPath. It iterates (loops) through a collection of items, one at a time, and executes a set of activities within the loop for each item.
Collection: Specify the list of files (folder path).
Loop Body: Inside the loop, use activities like “Move File” to move each file from the source to the destination folder.
The For Each activity ensures your automation processes each item in the collection efficiently, saving you time and effort.
What are the supported OCR (Optical Character Recognition) engines in UiPath?
UiPath supports several OCR engines for extracting text from images within your automations. Here’s a breakdown of the commonly used ones:
Built-in OCR Activities:
Google OCR: This activity leverages Google Cloud Vision for text recognition. It requires a Google Cloud API key and offers good accuracy for most scenarios. (Free tier available with usage limits)
Microsoft OCR: This activity utilizes Microsoft’s Computer Vision API for OCR. It also requires an API key and delivers good results for various image types. (Free tier available with usage limits)
OmniPage OCR: OmniPage OCR is another commercial OCR engine known for its accuracy and support for various languages and fonts.
Separate OCR Activities (through Packages):
Abbyy Cloud OCR: This option requires an Abbyy subscription and offers robust OCR capabilities, especially for complex layouts or low-quality images.
Tesseract OCR: An open-source OCR engine available as a UiPath package. While free to use, it might require more configuration and may not be as accurate as commercial options.
Choosing the Right OCR Engine:
The best OCR engine for your automation depends on factors like:
Accuracy Requirements: How critical is precise text recognition for your workflow?
Image Quality: Are you dealing with clear images or low-quality scans?
Processing Speed: How quickly do you need the text extraction to happen?
Cost: Free vs. paid options with subscription fees.
Additional Options:
UiPath offers other OCR-related activities like Click OCR Text and Hover OCR Text that allow you to interact with UI elements based on the recognized text.
By understanding these OCR engines and their capabilities, you can effectively extract text from images within your UiPath automations and achieve the desired results.
Is there any option for automatic recording in UiPath?
UiPath offers automatic recording to jumpstart workflow creation. Choose between Basic (simple clicks), Desktop (most common, records interactions with applications and windows), or Web recording (ideal for web browser automation).
This functionality captures your actions, saving development time and providing a visual reference. While great for initial automation steps, it might not handle complex logic and may require further editing for accuracy and efficiency. Overall, automatic recording accelerates development but often serves as a starting point for more robust workflows.
What is meant by the term 'Packaging' in UiPath?
In UiPath, the term “Packaging” refers to the process of bundling activities and other resources together into a reusable unit. These packages function like building blocks for your automations. Here’s a breakdown of the concept:
What’s Inside a Package?
Activities: The core components of a package are activities.
Dependencies: Some activities might rely on other activities to function correctly.
Other Resources (Optional): Additionally, packages may contain resources like arguments, variables, and configurations relevant to the included activities.
Benefits of Packaging:
Code Reusability: Packages promote code reuse.
Maintainability: Packages make maintenance easier.
Standardization: Packages help enforce standardization. Y
Distribution: Packages facilitate distribution. You can share or publish packages with others, allowing them to easily integrate the functionalities into their automations.
Types of Packages in UiPath:
UiPath offers two main types of packages:
Activity Packages: These contain reusable activities developed by UiPath or third-party vendors. They provide a vast library of functionalities you can leverage in your automations.
Process Packages: These encompass an entire UiPath workflow, including activities, variables, arguments, and other resources. They allow you to share or deploy complete automations as a single unit.
By effectively utilizing packaging in UiPath, you can streamline your automation development process, promote reusability, and maintain consistency within your automation projects.
Explain Control Flow in the context of UiPath.
In UiPath, control flow refers to the order and sequence in which activities are executed within your automation workflow. It dictates how your automation progresses, makes decisions, and handles loops. Effective control flow is crucial for building robust and efficient automations.
Sequences: The fundamental building block. Activities are arranged in a linear sequence, executing one after the other from top to bottom.
Decision-Making Activities: These activities control the flow based on conditions:
If Activity: Evaluates a condition (true/false) and executes different activities based on the outcome.
Switch Activity:Compares a value against multiple cases and executes activities specific to each matching case.
Loops: Used for repetitive tasks:
For Each Activity:Iterates through a collection of items, executing a set of activities for each item.
While Activity:Executes a set of activities as long as a specific condition remains true.
Do While Activity:Executes a set of activities at least once, then continues looping while a condition remains true.
Breaks and Continues:
Break Activity: Exits the current loop iteration prematurely.
Continue Activity: Skips the remaining activities in the current loop iteration and moves to the next iteration.
Try-Catch Activities: Handle errors and exceptions within your workflow:
Try Block: Contains activities that might potentially encounter errors.
Catch Block: Captures any errors that occur within the Try Block and allows you to define error handling actions.
What is the use of Delay activity?
The Delay activity in UiPath serves a specific purpose: it introduces a wait time or pause within your automation workflow. This intentional delay can be beneficial in various scenarios:
Synchronization: When interacting with external applications or systems, a delay might be necessary to ensure data is loaded or processed completely before your automation proceeds. This prevents errors due to premature actions.
Simulating User Behavior: For tasks mimicking human interaction, adding a short delay can enhance realism. For instance, you might insert a brief delay between typing characters to simulate natural typing speed.
Waiting for Specific Events: If your automation relies on an external event, like receiving an email or a file download completion, a delay can be used to periodically check for the event’s occurrence before moving forward.
Error Handling and Retries: In case of errors, a delay before retrying an action can be helpful. This allows the system or application some time to recover before your automation attempts the action again.
It’s important to use Delay activities judiciously. Excessive delays can slow down your automation and impact performance. Consider alternative approaches whenever possible, such as using wait conditions based on specific events or data availability.
Here are some additional points to remember about the Delay activity:
You can specify the delay duration in milliseconds (ms), seconds (s), or minutes (m).
UiPath also offers other waiting mechanisms like “Wait Until Activity” which allows waiting based on specific conditions.
By effectively using the Delay activity and considering alternatives, you can create well-paced and efficient UiPath automations that achieve the desired results without unnecessary waiting times.
Experience Level UiPath Interview Questions and Answers:
Explain various products of UiPath
UiPath Automation Cloud (Cloud-based offering, eliminates need for on-premises servers)
Discover: Process Mining, Task Capture (part of Task Mining), Communications Mining
Automate: Action Center, AI Center, Apps, Assistant, Data Service, Document Understanding, Integration Service
Operate: Automation Ops, Insights, Orchestrator, Test Suite (formerly known as UiPath Test Manager)
UiPath Automation Suite (On-premises offering, requires installation on your own servers)
Discover: Process Mining, Task Mining (includes Task Capture)
Automate: Action Center, AI Center, Apps, Assistant, Data Service, Document Understanding, Integration Service
Operate: Automation Ops, Insights, Orchestrator, Test Suite
Standalone (Individual products that can be purchased and deployed separately, on-premises or cloud)
Automate: Studio, StudioX, Studio Web (all development environments)
Operate: Orchestrator (server-based robot management), Robots (attended and unattended)
Note:
Asterisks (*) indicate products that are included in the Enterprise Edition of UiPath offerings.
This categorization simplifies the product list; some products might have functionalities that overlap across categories.
List various stages of RPA life cycle
This table outlines the professional stages involved in the UiPath RPA lifecycle, ensuring the successful development, deployment, and ongoing management of your robotic process automation (RPA) solutions.
Stage
Description
Key Activities
Deliverables
Discovery & Prioritization
Identify and prioritize high-value automation opportunities.
* Analyze business processes for automation suitability (repetitive, rule-based, high-volume). * Assess technical feasibility and data availability. * Calculate potential return on investment (ROI). * Prioritize processes based on impact and ease of automation.
* Documented process analysis report. * Prioritized list of processes for automation.
Design & Development
Design the automation solution and develop the RPA workflows.
* Define the automation scope and sequence of activities. * Develop detailed process flowcharts or wireframes. * Build robot scripts or workflows using UiPath Studio. * Integrate with necessary systems and applications.
* Detailed design document outlining the automation approach. * Functional robot scripts or workflows.
Testing & Validation
Thoroughly test the RPA solution to ensure accuracy and reliability.
* Conduct unit testing to verify individual activities within the workflow. * Perform integration testing to ensure seamless interaction with systems. * Execute user acceptance testing (UAT) to confirm functionality meets business requirements.
* Comprehensive test report documenting identified issues and resolutions. * Validated and approved RPA solution.
Deployment & Go-Live
Deploy the RPA solution into the production environment and initiate execution.
* Configure robot access to systems and data based on security protocols. * Schedule robot execution based on process needs. * Provide user training for attended automation scenarios.
Continuously monitor performance, identify and address issues, and maintain the RPA solution.
* Track robot performance metrics (e.g., accuracy, execution time). * Monitor for errors and exceptions. * Perform root cause analysis and address identified issues. * Update robot logic as processes evolve or require adjustments.
* Defined monitoring and maintenance procedures. * Continuously optimized and reliable RPA solution.
Following these professional stages ensures a well-defined RPA development process, leading to the implementation of robust and effective automation solutions that deliver tangible business benefits.
What is the need of UiPath in RPA?
UiPath isn’t RPA itself, but a powerful toolkit for building and Managing RPA solutions. Here’s why it stands out:
Easy to Use: UiPath Studio’s drag-and-drop interface makes RPA development accessible, even for non-programmers.
Rich Functionality: A vast library of activities tackles various automation needs, from data manipulation to web scraping.
Centralized Control: UiPath Orchestrator offers a central hub to manage, schedule, and monitor your RPA robots.
Scalable & Flexible: UiPath caters to diverse needs with different robot types and deployment options.
Boosts Productivity: Automating repetitive tasks frees up human workers for higher-value activities.
Reduces Costs: Streamlined processes minimize errors and operational costs.
In short, UiPath simplifies RPA development, empowering businesses to reap the benefits of automation.
What are the features of RPA?
Robotic Process Automation (RPA) has emerged as a transformative technology, empowering organizations to streamline operations, enhance efficiency, and unlock significant cost savings. Here’s a deeper dive into the core features that define RPA solutions and their impact on business processes:
1. Automating Repetitive Tasks:
Effortless Execution: RPA excels at automating high-volume, rule-based tasks that are often manual and time-consuming. This encompasses data entry, form filling, file manipulation, sending emails, and other repetitive processes, freeing up human capital for more strategic endeavors.
Enhanced Accuracy: By automating tasks, RPA eliminates human errors associated with manual data entry and processing, leading to increased accuracy and data integrity across operations.
Productivity Unleashed: Repetitive tasks are a drain on human productivity. RPA automates these mundane activities, allowing your workforce to focus on higher-value functions that require critical thinking, problem-solving, and human judgment.
2. Streamlining Workflows and Optimization:
Process Reimagination: RPA acts as a catalyst for process optimization. By automating specific steps within workflows, RPA helps identify and eliminate bottlenecks, leading to streamlined and more efficient workflows.
Seamless Integration: RPA boasts robust integration capabilities, seamlessly connecting with various existing IT systems and applications. This allows you to automate tasks across diverse platforms.
Throughput Acceleration: Automating tasks and streamlining workflows leads to a significant increase in the throughput of operations.
3. Cost Reduction Through Automation:
Operational Efficiency Gains: RPA solutions automate tasks that were traditionally handled by human workers, leading to significant reductions in manual labor costs associated with repetitive processes.
Reduced Errors and Rework: Improved accuracy through automation minimizes errors in data entry and processing. This not only enhances data quality but also reduces the need for rework and associated costs.
Faster Processing with Automation: Streamlined workflows and automation lead to faster processing times.
4. Scalability and Flexibility for Continuous Improvement:
Scalable Robot Workforce: RPA solutions boast a unique advantage – a scalable robot workforce. You can easily add or remove robots as your automation needs or business volume fluctuates.
Adaptable Automation: Business processes and systems are not static. RPA workflows can be easily adapted and modified to accommodate changes in business processes or system updates.
Deployment Options for Diverse Environments: RPA solutions offer deployment flexibility. You can choose on-premises, cloud, or a hybrid environment based on your specific IT infrastructure and security requirements.
5. Enhanced Compliance Through Automation:
Clear Audit Trails: RPA solutions document all automation activities, creating a clear and auditable trail. This simplifies compliance efforts and ensures adherence to regulatory requirements. With a comprehensive audit trail, you can easily demonstrate the traceability of actions and data changes within your processes.
Standardized Processes: This minimizes deviations and variations, reducing compliance risks and ensuring your processes meet all regulatory requirements.
Human Error Reduction: This strengthens your compliance posture by minimizing the risk of errors that could lead to non-compliance or regulatory breaches.
In conclusion, RPA features empower organizations to achieve significant benefits through automation. By leveraging RPA’s capabilities, you can streamline operations, enhance accuracy, reduce costs, improve scalability and flexibility, and strengthen your compliance posture. RPA serves as a powerful tool for driving organizational transformation and achieving a sustainable competitive advantage.
Explain types of Wildcards in UiPath
UiPath offers wildcards for selectors to handle dynamic UI elements.
Asterisk (*): Matches zero or more characters (e.g., targeting elements with dynamic IDs).
Question Mark (?): Matches a single character (e.g., handling buttons with varying greetings).
Use wildcards strategically:
Prioritize specific attributes for accuracy.
Avoid excessive usage to maintain performance.
Consider alternative targeting methods for long-term maintainability.
Mastering wildcards empowers you to build adaptable and efficient UiPath automations.
What is Robotic Automation?
Robotic Automation, also known as Robotic Process Automation (RPA), refers to a technology that utilizes software robots to automate repetitive, rule-based tasks traditionally performed by humans. Imagine having a digital assistant that can mimic your actions on the computer, handling tasks like data entry, form filling, file manipulation, sending emails, and more. That’s the essence of RPA!
Here’s a breakdown of key aspects of Robotic Automation:
Software Robots: The core of RPA are these software programs that mimic human interaction with computer applications.
Repetitive Tasks: RPA excels at automating high-volume, manual processes that are often tedious and error-prone.
Improved Accuracy: RPA robots eliminate human errors associated with manual data entry and processing, leading to increased accuracy and data integrity across operations.
Enhanced Productivity: Repetitive tasks are a drain on human productivity. RPA automates these mundane activities, allowing your workforce to focus on higher-value functions that require critical thinking, problem-solving, and human judgment.
Streamlined Workflows: RPA can identify and eliminate bottlenecks within workflows, leading to faster processing times and improved efficiency.
Benefits of Robotic Automation:
Reduced Costs
Increased Efficiency
Enhanced Compliance
Scalability and Flexibility
Overall, Robotic Automation serves as a powerful tool for organizations seeking to streamline operations, enhance efficiency, and unlock significant cost savings.
List out popular tools for RPA
You can get the list of RPA tool from below link Top RPA Tools
What is the difference between UiPath and Automation Anywhere?
Key differences between UiPath and Automation Anywhere, two leading Robotic Process Automation (RPA) tools:
Feature
UiPath
Automation Anywhere
Development Approach
Primarily workflow-based with flowchart style process design.
Primarily task-based with a focus on automating individual tasks.
User Interface
Drag-and-drop interface with a focus on visual development.
Offers a mix of drag-and-drop and scripting using Automation Anywhere Script (AAS).
Ease of Use
Generally considered easier to learn and use, especially for non-technical users.
May require some scripting knowledge for complex automations.
Scalability
Offers horizontal scalability through adding more robot instances.
Primarily scales vertically by increasing resources on existing servers.
Deployment Options
On-premises, cloud, and hybrid deployment options available.
Primarily cloud-based, with limited on-premises deployment options.
Integrations
Extensive library of pre-built connectors and activities for various applications.
Offers a good range of connectors, but may require custom development for some integrations.
AI Capabilities
Offers a suite of AI-powered features like process mining and document understanding (through integration with UiPath AI Center).
Offers AI capabilities through integration with third-party products like Verint or Google Cloud AI.
Pricing
Transparent pricing structure with various licensing options.
Primarily quote-based pricing, making it difficult to compare upfront costs.
Strengths
User-friendly interface, extensive pre-built activities, strong integrations, robust AI capabilities.
Scalability, security features, task-based approach suitable for complex automations.
What is a thin client?
What is a thin client?
Thin clients, with their remote server architecture, pose a challenge for UiPath automation. Traditional methods struggle due to limited UI access and dynamic elements.
Challenges:
Restricted UI interaction: Thin clients limit access to UI elements, hindering clicks, typing, and other core automation techniques.
Unreliable selectors: Dynamic UI attributes can cause UiPath selectors to break as element IDs or classes change frequently.
Examples:
Citrix Virtual Desktops
RDP Applications
Certain Web Applications
Overcoming Obstacles:
Image/OCR Automation:Robots can use image recognition and OCR to mimic user actions by identifying visual elements on the screen.
API Automation: If available, robots can integrate with application APIs to automate tasks through programmatic commands.
Third-party Tools: Specialized tools can bridge the automation gap for thin client environments.
Key Takeaway:
Carefully assess target applications before attempting UI interaction methods. Consider alternative approaches to ensure successful RPA development in thin client environments.
What is sequence activities in UiPath?
In UiPath, sequence activities are the building blocks for automation. They represent a linear flow of tasks your robot executes one after another.
Modular Design:Sequences break complex automations into manageable units, promoting organization, maintenance, and code reusability.
Simple Creation:UiPath Studio’s user-friendly interface allows you to visually design sequences by dragging and dropping activities.
Reusable Components:Developed sequences can be reused across automations, saving time and ensuring consistency.
Mastering sequences is essential for building efficient UiPath workflows that streamline your business processes.
Creating a Simple Sequence:
Let’s say you want to create a sequence that asks the user for their first name, last name, and hair color, and then displays their answers.
Here’s how you can do it:
Create a blank process in UiPath.
On the Design tab, select New > Sequence.
Name the sequence (e.g., “UserInfoSequence”).
Add three Input Dialog activities to ask for first name, last name, and hair color.
Store the user input in string variables (e.g., FirstName, LastName, and HairColor).
Use a Message Box activity to display the gathered information (e.g., FirstName + " " + LastName + " has " + HairColor + " hair.").
Run the automation, and it will prompt the user for input and display the combined message.
What is the State of a machine?
State of a machine in Uipath
In UiPath, a state machine’s state represents a specific stage in your automation process. These states are connected by transitions triggered by conditions, forming a visual map of your automation logic. This structure improves readability, enforces controlled execution, and allows for error handling and reusability.
Differentiate between Blue Prism and Automation Anywhere
Here’s a breakdown of the key differences between Blue Prism and Automation Anywhere, two prominent Robotic Process Automation (RPA) tools:
Feature
Blue Prism
Automation Anywhere
Development Approach
Primarily object-oriented with a focus on process modeling.
Primarily script-based with a focus on automating individual tasks.
User Interface
Code-centric interface with visual process modeling capabilities.
Offers a mix of drag-and-drop and scripting using proprietary languages (IQ Bot scripting or AAE scripts).
Ease of Use
Generally considered steeper learning curve due to its code-centric approach.
Can be easier to learn for basic automations, but scripting is needed for complex tasks.
Scalability
Highly scalable with horizontal and vertical scaling options.
Primarily scales vertically by increasing resources on existing servers.
Deployment Options
Primarily on-premises deployment, with limited cloud capabilities.
Primarily cloud-based, with on-premises deployment options available.
Integrations
Offers a good range of connectors, but may require custom development for some integrations.
Offers a good range of connectors, with a focus on pre-built integrations.
AI Capabilities
Offers limited built-in AI capabilities, but integrates with external AI platforms.
Offers built-in AI capabilities through its Discovery Bot and Verint integration.
Pricing
Primarily quote-based pricing, making it difficult to compare upfront costs.
Transparent pricing structure with various licensing options.
Strengths
High scalability, security features, object-oriented approach for complex processes.
User-friendly interface for basic tasks, built-in AI capabilities, strong pre-built integrations.
Choosing the Right Tool:
Your ideal RPA tool hinges on your specific needs:
Technical Expertise: If your team has a strong programming background, Blue Prism’s code-centric approach might be suitable.
Process Complexity: For highly intricate automations, Blue Prism’s object-oriented approach offers better control. Automation Anywhere excels in simpler, script-based automation.
Deployment Needs: If cloud deployment is crucial, Automation Anywhere offers a strong cloud-based solution. On-premises deployment is Blue Prism’s primary strength.
AI Requirements: If built-in AI functionalities are a priority, Automation Anywhere might be a better fit. Blue Prism integrates with external AI platforms.
By carefully evaluating these factors and strengths, you can select the RPA tool that best empowers your organization to streamline operations and achieve automation success.
List out the things that can be automated using RPA
Robotic Process Automation (RPA) has become a cornerstone of operational excellence in today’s business landscape. By automating repetitive, high-volume tasks, RPA empowers organizations to achieve significant improvements in efficiency, accuracy, and cost savings. Let’s delve deeper into how RPA streamlines workflows across various departments:
Enhanced Customer Onboarding: Streamline the new customer experience by automating tasks like contract generation and data entry. This ensures a smooth and efficient onboarding process, potentially reducing customer churn and fostering positive brand perception.
Effortless Data Management: Departments like HR, customer service, and marketing often grapple with maintaining accurate and up-to-date customer or personnel data. RPA automates data updates by seamlessly populating new information from forms or emails into relevant systems. This eliminates manual entry errors and ensures data integrity across the organization.
Robust Data Validation: RPA complements existing database validation controls by providing an additional layer of security. Its ability to cross-check data against external sources, coupled with its scalability and ease of integration, makes it an efficient tool for robust data validation practices.
Intelligent Data Extraction: Reimagine data extraction from various formats, including PDFs, scanned documents, and more. RPA utilizes screen scraping, Optical Character Recognition (OCR), and pattern recognition technologies to automate data extraction with remarkable efficiency, freeing up human resources for more strategic tasks.
Automated Reporting and Analytics: Eliminate the tedium of report generation and distribution. RPA can auto-generate reports, analyze their contents using built-in functionalities or integrations with BI tools, and deliver them to designated personnel. This not only saves valuable time and resources but also fosters data-driven decision-making.
Streamlined Invoicing: RPA automates invoice generation and delivery based on predefined rules. This ensures error-free invoices are sent promptly, improving cash flow and customer satisfaction.
Intelligent Inventory Management: Eliminate manual effort in inventory management. RPA can monitor stock levels, automatically reorder products based on pre-defined parameters, and keep inventory data up-to-date, optimizing stock management and reducing the risk of stockouts.
Accurate Payroll Processing: Payroll calculations are often complex and error-prone. RPA automates salary, deduction, and bonus calculations, ensuring accuracy and adherence to compliance regulations, freeing up HR personnel to focus on more strategic initiatives.
Simplified Vendor Management: Streamline vendor records management with RPA. It automates tasks like maintaining vendor information, tracking contracts, and managing communication, eliminating manual effort and streamlining the entire vendor management process.
Automated Compliance Management: Ensure seamless adherence to legal and tax requirements. RPA automates repetitive compliance tasks such as data collection, report generation, and audit preparation, freeing up the workforce to focus on higher-value activities.
By strategically implementing RPA across various departments, organizations can achieve significant improvements in operational efficiency, data accuracy, and cost savings. This ultimately translates to a more productive workforce, enhanced customer experiences, and a competitive advantage in the marketplace.
Mention the steps to create a project and execute in UiPath studio?
Here’s a breakdown of the steps to create a project and execute it in UiPath Studio:
1. Launch UiPath Studio:
Double-click the UiPath Studio icon on your desktop or access it from the Start menu.
2. Create a New Project:
Go to the “Home” tab in the Studio ribbon.
Click on “Process” to initiate a new project.
In the “New Blank Process” window, enter a descriptive name for your project and (optional) a brief description in the dedicated fields.
Choose a location to save your project by clicking “Browse” and selecting the desired folder.
Click “Create” to establish your new UiPath project.
3. Design Your Automation Workflow:
The designer panel will become your primary workspace.
From the “Activities” panel on the left, explore the various activities available for automating tasks. These encompass actions like opening applications, interacting with UI elements, data manipulation, and more.
Drag and drop the desired activities from the “Activities” panel onto the designer workspace to visually construct your automation sequence.
Double-click each activity to configure its properties and specify how it should interact with applications or data.
4. Link Activities (Optional):
Use sequence arrows to connect activities that depend on each other’s output. This defines the execution flow of your automation.
5. Integrate Variables (Optional):
If your automation requires storing and manipulating data, create variables in the “Variables” tab. You can then reference these variables within your activities for dynamic behavior.
6. Debug and Test (Highly Recommended):
Before executing your automation, it’s crucial to test it thoroughly. Use the debug functionality (F11 key) to step through your automation and identify any potential errors.
Test your automation with various data inputs to ensure it behaves as expected under different scenarios.
7. Execute the Automation:
Once you’re confident in your automation’s functionality, click the “Run” button (green play icon) on the top toolbar. This initiates the execution of your automation sequence.
8. Monitor Execution (Optional):
The “Output” panel displays information about the automation’s execution, including success messages, warnings, or errors.
9. Save Your Project:
Regularly save your project using the “Save” button (floppy disk icon) to preserve your work.
Additional Tips:
Utilize UiPath documentation and online tutorials for in-depth guidance on specific activities and functionalities.
Consider using UiPath Orchestrator for centralized management and deployment of your automation projects in a production environment.
By following these steps and leveraging UiPath’s intuitive interface, you can create and execute robust automations to streamline your workflows and enhance efficiency.
What is the difference between Basic and desktop recording?
In UiPath Studio, both Basic recording and Desktop recording are functionalities used to capture user actions and translate them into automated workflows. However, they differ in their approach, efficiency, and generated code structure:
Basic Recording:
Approach: Focuses on capturing individual UI element interactions.
Efficiency: Less efficient for complex automations due to repetitive activity creation for each interaction.
Generated Code: Creates a separate “Click” or “Type Into” activity for each interaction, resulting in a longer and less streamlined workflow.
Use Cases: Suitable for simple automations with a limited number of UI interactions, especially when the UI elements have stable IDs.
Desktop Recording:
Approach: Captures the entire user experience on the desktop, including mouse movements and window interactions.
Efficiency: More efficient for complex automations as it generates a single container activity encompassing the entire recording.
Generated Code: Creates a container activity with nested child activities representing individual interactions. This results in a more concise and maintainable workflow.
Use Cases: Ideal for most automation scenarios, especially when dealing with dynamic UIs or multiple UI interactions within the same application window.
Here’s a table summarizing the key differences:
Feature
Basic Recording
Desktop Recording
Approach
Captures individual UI element interactions.
Captures the entire user experience on the desktop.
Efficiency
Less efficient for complex automations.
More efficient for complex automations.
Generated Code
Separate activities for each interaction.
Container activity with nested child activities.
Use Cases
Simple automations with stable UI element IDs.
Most automation scenarios, especially dynamic UIs or multiple interactions.
Choosing the Right Recording Method:
The optimal recording method depends on the complexity of your automation and the nature of the UI elements you’re interacting with:
For simple automations with a handful of stable UI interactions, Basic recording might suffice.
For most automation scenarios, especially those involving complex workflows, dynamic UIs, or multiple interactions within a single application window, Desktop recording is generally recommended.
Remember, you can always start with a Basic recording and then convert it to a Desktop recording for more efficient workflow management
List types of OCR engine available in the market
OCR Engines: A Look at Top Options
Optical Character Recognition (OCR) engines convert images and PDFs into editable text. Here’s a quick overview of popular choices:
Cloud-Based:
Focus: Structured documents (invoices, receipts) or versatility (handwritten text)
Examples: Amazon Textract, Google Cloud Vision OCR, Microsoft Azure Cognitive Services OCR
Pricing: Pay-per-use or subscriptions
On-Premise:
Focus: High accuracy, offline processing, complex layouts (optional)
Tesseract OCR (Open-Source): Good for basic tasks, requires developer expertise.
Choosing the Right Engine:
Consider cloud options for ease of use and scalability, or on-premise for offline processing. Evaluate accuracy, document types supported, and pricing to find the best fit for your needs.
What is the need for Element Exists?
In UiPath, the “Element Exists” activity serves a crucial purpose within your automation workflows. It acts as a gatekeeper, verifying the presence of a specific UI element on the target application before proceeding with further actions. Here’s why “Element Exists” is essential:
Ensuring Automation Reliability:
Robust Error Handling: Imagine your automation clicks a button that only appears under certain conditions. If you don’t check if the button exists first, your automation might fail due to an unexpected UI state. “Element Exists” helps prevent such errors by verifying the element’s presence before interacting with it. This builds robustness into your automations and minimizes disruptions.
Conditional Execution: “Element Exists” allows you to control the automation flow based on the presence or absence of an element. You can use conditional statements (like “If” or “Switch”) to define different execution paths depending on the outcome of the “Element Exists” check. This enables your automation to adapt to dynamic UI behavior, making it more resilient and flexible.
Example Scenario:
Imagine automating a login process. You can use “Element Exists” to check if the “Username” field appears before entering credentials. If the element doesn’t exist, it might indicate the login page hasn’t loaded completely, or the UI has changed. Your automation could then handle this scenario by refreshing the page, displaying an error message, or waiting for a specific timeframe before retrying.
Beyond Error Handling:
Synchronization: “Element Exists” can be used in conjunction with wait activities to synchronize your automation with the target application. By waiting for the element to appear before proceeding, you ensure that the UI is ready for interaction, preventing errors caused by premature actions.
Dynamic UI Handling: For UIs that change dynamically, using “Element Exists” in combination with other activities like “Click” or “Type Into” allows you to build more adaptable automations. The check ensures your automation interacts with the element only when it’s present on the screen, even if its location or properties change.
In conclusion, the “Element Exists” activity is a fundamental building block for robust and reliable UiPath automations
What are the contentions in UiPath?
Contentions in UiPath are a mechanism used to manage resource conflicts within your automations, particularly when dealing with shared resources across multiple robots. Here’s a breakdown of their purpose and functionality:
Purpose:
Preventing Resource Conflicts: When multiple robots attempt to access and modify the same resource (like a file or database record) simultaneously, it can lead to errors and inconsistencies. Contentions help prevent such conflicts by establishing a locking mechanism.
Functionality:
Declaring a Contention: You define a contention within your automation workflow by using the “Use Global Queue” or “Use Queue Item” activities.
Specifying the Resource: Assign a unique name to the contention, which identifies the specific resource being protected.
Locking the Resource: When an automation encounters the contention activity, it attempts to acquire a lock on the designated resource.
Exclusive Access: If the lock is successfully acquired, the automation has exclusive access to the resource and can proceed with its operations.
Conflict Resolution: If another automation tries to access the same resource while it’s locked, it will either wait for the lock to be released or proceed based on pre-defined behavior (like throwing an exception or retrying after a delay).
Releasing the Lock: Once the automation finishes using the resource, it releases the lock, allowing other automations to access it.
Types of Contentions:
UiPath offers different contention types to suit various scenarios:
String: Useful for simple locking mechanisms with string identifiers.
Object: Suitable for more complex scenarios where you need to pass additional data along with the contention name.
Integer (Int32): Can be used for numeric identifiers.
Queue: Applicable when dealing with queues as shared resources.
Benefits of Using Contentions:
Data Integrity: Contentions ensure data consistency by preventing multiple robots from modifying the same data simultaneously.
Improved Reliability: They minimize errors and unexpected behavior caused by resource conflicts.
Scalability: Contentions facilitate reliable automation execution even when multiple robots operate on the same data or applications.
In Conclusion:
Contentions are a valuable tool in UiPath for managing shared resources and ensuring the smooth execution of your automations. By understanding their purpose and utilizing them effectively, you can develop robust and scalable RPA solutions.
List the email protocols available in UiPath
UiPath’s “Mail” activities package empowers you to automate email interactions through various protocols. Here’s a table outlining the supported protocols:
Protocol
Description
Use Cases
POP3
Post Office Protocol Version 3
– Downloading emails from a mail server. <br> – Suitable for scenarios where you only need to access emails on a single device.
IMAP
Internet Message Access Protocol
– Downloading and managing emails on a mail server. <br> – Allows functionalities like moving, deleting, and marking emails as read/unread on the server. <br> – Ideal for accessing emails from multiple devices and maintaining consistency.
SMTP
Simple Mail Transfer Protocol
– Sending emails from your automation workflow. <br> – Useful for sending notification emails, reports, or automated responses.
Exchange
Microsoft Exchange Server Integration
– Seamless integration with Microsoft Exchange for comprehensive email management. <br> – Enables functionalities like sending, receiving, deleting, moving, and searching emails directly within the Exchange server. <br> – Requires additional configuration for authentication and server access.
Choosing the Right Protocol:
The optimal protocol for your automation depends on your specific needs:
For simply downloading emails from a server for processing, POP3 might suffice.
For more comprehensive email management, including sending emails and server-side actions, IMAP or Exchange are preferred.
Exchange integration offers the most functionality but requires a Microsoft Exchange environment.
Explain Do While Activity in UiPath
The Do While activity in UiPath executes a loop at least once, then repeats until a condition turns false. It’s ideal for scenarios where you need an action to happen regardless of the initial state, and the loop should continue until a specific criteria is met.
Here’s the gist:
Define a condition (loop stops when false).
The loop body executes (your automation actions).
Condition is checked:
True: Loop repeats.
False: Loop exits.
This “do-then-check” structure makes Do While useful for iterative tasks and adaptable automation behavior.
Advanced Level UiPath Interview Questions and Answers for Experienced:
Establishing Connectivity Between Robots and UiPath Orchestrator
In UiPath, establishing a connection between robots and Orchestrator is a crucial step for orchestrating and managing your Robotic Process Automation (RPA) deployments. This connection facilitates the deployment of workflows to robots, centralizes execution control, and allows for monitoring and logging of automation activities. There are two primary methods for connecting robots to Orchestrator, catering to the distinct needs of attended and unattended robots:
Method 1: Leveraging Machine Key for Attended Robots
This method is specifically designed for attended robots, which require human interaction during the automation process. Here’s a breakdown of the steps involved:
Access the UiPath Assistant: Locate and launch the UiPath Assistant application, typically found in your system tray or taskbar.
Navigate to Preferences: Within the Assistant interface, locate and click on the “Preferences” option.
Configure Orchestrator Settings: Identify the “Orchestrator Settings” section and proceed to configure the connection details.
Select Machine Key Connection Type: Choose “Machine Key” as the connection type from the available options.
Input Machine Key: Locate and enter the unique Machine Key generated within Orchestrator for the specific robot you intend to connect. This key can be found in the “Machines” section of your UiPath Orchestrator instance.
Specify Orchestrator URL: Provide the web address of your UiPath Orchestrator instance to establish the communication channel.
Initiate Connection: Click the “Connect” button to establish the connection between the attended robot and Orchestrator.
Method 2: Utilizing Client Credentials for Unattended Robots
This method is employed for unattended robots, which operate on dedicated machines without requiring human intervention. Follow these steps to connect unattended robots:
Launch the UiPath Assistant: As with attended robots, open the UiPath Assistant application on the unattended robot machine.
Access Preferences: Navigate to the “Preferences” section within the Assistant interface.
Configure Orchestrator Settings: Locate the “Orchestrator Settings” and proceed to configure the connection details.
Select Client ID Connection Type: Choose “Client ID” as the connection type for this method.
Enter Client Credentials: Provide the Client ID and corresponding Client Secret generated within Orchestrator for the robot template used to deploy the unattended robot. These credentials can be found in the “Robot Templates” section of your UiPath Orchestrator instance.
Specify Orchestrator URL: As with attended robots, enter the web address of your UiPath Orchestrator instance to establish communication.
Establish Connection: Click the “Connect” button to finalize the connection between the unattended robot and Orchestrator.
Additional Considerations:
Network Connectivity: Ensure proper network communication between the robot machine and Orchestrator, addressing any firewall or network restriction issues that might impede connection.
Credential Verification: Double-check the accuracy of the entered credentials, whether it’s the Machine Key or Client ID/Secret combination, to avoid connection errors.
Unattended Robot Configuration: For unattended robots, verify that the robot template used for deployment within Orchestrator has the correct connection information configured.
By following these comprehensive methods and considerations, you can effectively establish a seamless connection between your robots and UiPath Orchestrator. This paves the way for streamlined deployment, centralized management, and efficient execution of your RPA workflows within your organization.
Why UiPath tool better than AA or Power Automation?
UiPath is recommended for RPA due to its user-friendly interface, scalability, and robust features. Compared to Automation Anywhere (AA) and Power Automate, UiPath has distinct advantages:
Custom Activity connecter UiPath Allow us to create the custom activity which give us freedom to create connecter and Connect to any Systems by creating NuGet packages.
Dot Net framework / Flexibility on coding: UiPath allow us to write the code in C#, vb.net which allow us use the native code access.
Module Development: UiPath allow us to develop the project module wise and reuse this later stage.
Test / AI / OCR: UiPath give us more advantage handling the complex solution by providing feature of AI, Document Understanding, Testing solution and many more.
User-Friendly Interface: UiPath provides a more intuitive and easy-to-use interface, making it accessible for both developers and non-developers.
Enhancement : UiPath provide scalability, allowing organizations to efficiently scale automation initiatives from small projects to enterprise-level implementations.
Robust Features: UiPath boasts a comprehensive set of features, including advanced automation capabilities, integrations, and a thriving community for support and resources.
the above factors make UiPath a preferred choice over other RPA tools. ensuring a smoother automation journey with enhanced usability, scalability, and feature richness compared to AA and Power Automation.
How to inject Java script Code in web browser ? and explain me when we have to use this?
To inject JavaScript code into a web browser using UiPath, you can use the “Inject JS Script” activity. This activity allows you to run JavaScript code directly in the web page.
Here are the steps:
Place “Inject JS Script” Activity:
Open your UiPath project.
Drag and drop the “Inject JS Script” activity onto your workflow.
Configure the Activity:
In the properties of the “Inject JS Script” activity, locate the “Script” property.
Set the value of the “Script” property to your JavaScript code.
Indicate the Browser Window: Use other activities like “Attach Browser” or “Open Browser” to indicate the browser window where you want to inject the JavaScript code.
Run the Workflow: Run your UiPath workflow.
When to use this:
Dynamic Web Interactions: You might need to interact with web elements that are dynamically loaded or manipulated through JavaScript.
Page Customization: If you need to customize the appearance or behavior of a web page, injecting JavaScript can be useful.
Handling Special Cases: In some cases, web automation might require specific JavaScript operations that cannot be easily achieved with standard UiPath activities.
Example: Let’s say you want to click a button on a webpage, and the button is loaded dynamically through JavaScript. You can use the “Inject JS Script” activity to execute a script that interacts with the dynamically loaded button.
document.querySelector(‘button’).click();
Ensure that you understand the structure of the web page and the behavior you want to achieve with the injected JavaScript code. Testing the JavaScript code in the browser console before integrating it into UiPath can be helpful
How to pass argument in Exe Via UiPath ?
To pass arguments to an external executable (EXE) file from UiPath, you can use the “Start Process” activity. Here are the steps:
Place “Start Process” Activity:
Open your UiPath project.
Drag and drop the “Start Process” activity onto your workflow.
Configure Process Properties:
In the properties of the “Start Process” activity, locate the “FileName” property.
Set the value of the “FileName” property to the path of your executable (EXE) file.
Specify Arguments (Optional):
If your EXE file accepts command-line arguments, you can provide them in the “Arguments” property.
For example, if your EXE file expects an argument like exampleArgument, you can set the “Arguments” property to /exampleArgument.
Run the Workflow: Run your UiPath workflow.
The “Start Process” activity will execute the specified EXE file, and any provided arguments will be passed to the executable during execution.
Remember to check the documentation or user guide of the specific executable to understand how it expects command-line arguments and configure the “Arguments” property accordingly.
What are Version Control supported by UiPath?
UiPath supports integration with popular version control systems (VCS) for managing and tracking changes in automation projects. The main version control systems supported by UiPath are:
Git: A widely used distributed version control system. UiPath Studio allows you to connect to Git repositories for source code management.
TFS (Team Foundation Server): UiPath supports integration with Microsoft’s Team Foundation Server for version control and collaboration.
SVN (Apache Subversion): UiPath can integrate with Subversion, a centralized version control system.
Mercurial: UiPath Studio also supports integration with the Mercurial version control system.
How to call Vb script in UiPath ?
In UiPath, you can use the “Invoke VBA” activity to call a VBScript (.vbs) file. Here are the steps to call a VBScript in UiPath:
Place “Invoke VBA” Activity:
Open your UiPath project.
Drag and drop the “Invoke VBA” activity onto your workflow.
Specify VBScript File:
In the properties of the “Invoke VBA” activity, locate the “FileName” property.
Set the value “FileName” property to the path of your VBScript (.vbs) file.
Configure Arguments (Optional): If your VBScript accepts arguments, you can configure them in the “Arguments” property.
Run the Workflow: Run your UiPath workflow.
The “Invoke VBA” activity will execute the specified VBScript file during the workflow run. Make sure that your VBScript file is correctly written and handles any required input parameters. UiPath to allow VBScript functionality as part of your automation process.
What is the meaning of publishing an automation project?
In UiPath, publishing an automation project refers to the process of creating a deployable package that can be executed by robots. It’s like preparing your workflow for action! Here’s a breakdown of what publishing does:
Essentially:
Publishing creates a compressed archive containing all the necessary files for your workflow to run smoothly.
This archive includes the workflow itself, any referenced libraries, and dependencies.
Benefits of Publishing:
Deployment: Enables you to easily deploy your automation project to robots (both attended and unattended) within your UiPath Orchestrator environment.
Version Control: Facilitates version management by creating a clear snapshot of your workflow at the time of publishing, ensuring consistency during deployment.
Security: (Optional) You can password-protect published packages for added security during deployment.
Publishing Process (Simplified):
Within UiPath Studio, open the workflow you want to publish.
Navigate to the “Design” tab in the ribbon menu.
Click the “Publish” button.
(Optional) Configure publishing settings like password protection or specific versions of referenced libraries.
The published package will be saved to a designated location, ready for deployment to robots.
Remember:
Publishing doesn’t directly execute the workflow. It prepares it for deployment to robots managed by Orchestrator.
Orchestrator then takes care of scheduling, triggering, and executing the published workflows on designated robots.
By publishing your automation projects, you streamline the deployment process and ensure your robots have the necessary resources to execute your workflows effectively.
Differentiate between mainframe applications and non-mainframe applications
Here’s a breakdown of the key differences between mainframe applications and non-mainframe applications in the context of UiPath:
Feature
Mainframe Applications
Non-Mainframe Applications
Interface
Text-based screens, often green screens (terminal emulation).
Graphical User Interface (GUI) with windows, menus, and buttons.
Interaction
Limited interactivity, often requiring keyboard navigation.
User-friendly interaction with mouse and keyboard.
Data Entry
Manual data entry through character-by-character typing.
Supports various data entry methods (typing, dropdowns, selections).
Automation Challenges
Special techniques and activities needed for screen scraping.
Standard UiPath activities can often interact directly with the UI.
Processing Speed
Generally slower processing compared to modern applications.
Typically faster processing due to modern architecture.
Development Tools
Proprietary development languages or tools.
Diverse development languages and tools (e.g., Java, .NET).
UiPath Considerations:
Mainframe Automation: UiPath offers specific activities and libraries for automating interactions with mainframe applications, including screen scraping and data manipulation.
Non-Mainframe Automation: Standard UiPath activities are generally sufficient for automating most non-mainframe applications with graphical user interfaces.
In essence:
Mainframe applications are legacy systems with a text-based interface requiring specialized automation techniques in UiPath.
Non-mainframe applications are modern applications with graphical user interfaces that can often be automated using standard UiPath activities.
What is UiPath append range?
UiPath’s “Append Range” activity lets you add data to Excel sheets. It takes data from a DataTable variable and inserts it as new rows in your specified sheet. This automates data entry, reduces errors, and handles various data types. It’s ideal for appending extracted data or building dynamic reports with real-time Excel updates. Remember to match data table columns to the target Excel sheet for accurate placement.
Explain the ways to create Variable in UiPath
UiPath offers several ways to create variables, allowing you to store and manage data within your workflows:
1. Using the Variables Panel:
Open the Variables panel (often located on the right side of the UiPath Studio interface).
Click the “New” button.
Define the variable’s:
Name: A unique and descriptive name for the variable (e.g., customerName, totalItems).
Data Type: Select the type of data the variable will hold (e.g., String, Integer, Boolean, DataTable).
Scope: Choose the visibility of the variable (e.g., Global – accessible throughout the project, Private – specific to the workflow).
2. Directly in Activities:
While creating your workflow, some activities might have dedicated fields for variable creation.
Right-click on a field within the activity.
Select “Create Variable” from the context menu.
Define the name, data type, and scope as mentioned above.
3. Using Keyboard Shortcut (Optional):
Press Ctrl + K while your cursor is within a field where a variable can be created.
This shortcut opens a similar window for defining the variable’s properties.
Choosing the Right Method:
Use the Variables panel for a clear overview and organization of all your project’s variables.
Use direct creation within activities for a quick and convenient way to create variables specific to that activity.
The keyboard shortcut can be a time-saver for frequent variable creation.
By understanding these methods, you can efficiently create and manage variables within your UiPath workflows, ensuring proper data handling and reusability across your automations.
Explain switch activity
The Switch activity in UiPath provides a way to make decisions based on the value of a single variable. It’s like a multiple-choice question for your workflow, where the chosen path depends on the answer (variable value).
Here’s a breakdown:
Input: You specify a variable whose value will determine which branch to execute.
Cases: Define different conditions (based on the variable’s value) and corresponding actions for each case.
Default (Optional): If the variable value doesn’t match any defined case, the default actions (if any) are executed.
Benefits:
Clearer Logic: Switch activities enhance code readability compared to nested if statements.
Efficient Branching: Handles multiple branching scenarios more efficiently.
Example: Imagine sorting incoming emails based on a priority field (variable):
Case 1: “High” priority – Move to urgent folder.
Case 2: “Medium” priority – Schedule for review later.
Case 3: “Low” priority – Move to a designated folder.
Default: If priority is not set, move to the inbox.
By using a Switch activity, you can streamline your workflow’s decision-making process based on variable values.
Explain while activity
The While activity in UiPath is a workhorse for repetition. It executes a set of actions as long as a condition is true. Imagine a “do-over loop” that keeps going until a certain criteria is met. Perfect for automating repetitive tasks until a condition like “all rows processed” is reached.
What is an Array?
In UiPath, an array is a collection of items of the same data type. It allows you to store and manage multiple values under a single variable name. Imagine an array as a container with multiple slots holding similar data types. This simplifies handling repetitive data within your UiPath workflows.
How to automate database?
Incorporating database interactions into your UiPath workflows unlocks powerful automation possibilities for managing and manipulating data. This guide outlines the steps involved in establishing a connection, performing actions, and processing retrieved information, ensuring your workflows interact with databases efficiently.
Prerequisites:
UiPath Studio: Ensure you have UiPath Studio installed with the UiPath.Database.Activities package. This package provides essential activities for database interactions.
Database Knowledge: Familiarity with the target database system (e.g., SQL Server, MySQL, Oracle) and its connection details (server name, username, password) is crucial.
Steps:
Workflow Design:
Clearly define the database actions you want to automate (read, insert, update data).
Utilize variables to store dynamic data used within your queries, enhancing flexibility.
Install UiPath.Database.Activities Package:
Open the “Manage Packages” tab within UiPath Studio.
Search for “UiPath.Database.Activities” and install the latest version.
Establish Database Connection:
Drag and drop the “Connect” activity onto your workflow designer.
Configure the following properties within “Connect”:
Database Type: Select the appropriate database type (e.g., SQL Server, MySQL).
Connection String: Construct a connection string containing server name, username, and password details. Leverage variables for dynamic connection strings if necessary.
Perform Database Actions:
Select the appropriate activity based on your automation goal:
Execute Query: Retrieve data from the database using a well-structured SQL query. Store the retrieved data within a DataTable variable within your workflow.
Execute Non Query: Perform actions that don’t return data, such as INSERT, UPDATE, or DELETE statements. Configure details like the SQL query and any required parameters (employ variables if applicable) within the activity properties.
Process Retrieved Data (if applicable):
If you utilized “Execute Query”, leverage loops and other activities to iterate through the DataTable variable containing the retrieved data. Perform necessary actions such as writing data to another system or displaying results in a user interface.
Disconnect from the Database:
Drag and drop the “Disconnect” activity at the workflow’s end to properly close the database connection.
Testing and Execution:
Meticulously review your connection details and queries for accuracy.
Run your workflow and verify successful interaction with the database as intended.
Best Practices:
Implement parameterized queries to avoid embedding values directly within your SQL statements, promoting security and adaptability.
Integrate error handling mechanisms to gracefully manage potential database errors during execution.
Consider employing transactions for complex database operations that require maintaining data consistency.
By adhering to these guidelines and leveraging the capabilities of UiPath, you can effectively automate database interactions within your workflows, streamlining data manipulation tasks and bolstering your automation potential.
List out different types of decision activities available in UiPath
UiPath offers several decision-making activities within the Control Flow category to guide your workflows based on specific conditions. Here’s a breakdown of the most common types:
Flow Decision:
The most basic decision activity.
Allows you to define a single condition based on comparisons or logical operators (AND, OR).
Based on the condition evaluation (True/False), the workflow branches to separate paths for further actions.
Flow Switch:
Ideal for scenarios with multiple possible conditions.
Enables you to specify a variable and compare it against different case values.
The workflow executes the path associated with the matching case value.
Includes a “Default” option for handling situations where none of the specified cases match.
If Activity:
Similar to Flow Decision but offers more flexibility.
Allows defining a condition and separate “Then” and “Else” sections for actions based on the condition’s evaluation.
Useful for creating more complex decision logic with specific actions for both True and False outcomes.
While Activity:
Creates a loop that executes a sequence of activities repeatedly as long as a specified condition remains True.
Often used for iterative tasks where the condition determines when the loop should stop.
Do While Activity:
Similar to While Activity but ensures the loop body executes at least once, regardless of the initial condition.
The condition is then evaluated after each iteration to determine loop continuation.
Choosing the Right Decision Activity:
Flow Decision: Use for simple True/False branching based on a single condition.
Flow Switch: Use for multi-way branching based on comparing a variable against different case values.
If Activity: Use for more complex decision logic with separate actions for True and False outcomes.
While Activity: Use for iterative tasks with a loop that continues as long as a condition is True.
Do While Activity: Use for scenarios where at least one iteration is necessary, followed by conditional loop continuation.
By understanding these decision activities and their functionalities, you can effectively control the flow of your UiPath workflows based on various conditions, making your automations more adaptable and intelligent.
Mention the limitations of UiPath Community Edition
UiPath Community Edition offers a robust platform for learning RPA and building basic automations, but it comes with certain limitations compared to the paid Enterprise Editions. Here’s a breakdown of some key limitations:
Number of Robots:
Community Edition allows for a maximum of 2 attended robots. This limits large-scale deployments where many robots might be needed to automate tasks across multiple machines.
Orchestrator Features:
A cloud-hosted Orchestrator is provided with the Community Edition. While it offers basic functionalities for managing robots and workflows, it might lack features like high availability, disaster recovery, and advanced user management controls present in Enterprise Orchestrator deployments.
Limited Connectors:
The Community Edition provides a subset of connectors compared to Enterprise Editions. This might restrict your ability to interact with certain applications or systems during automation.
No Dedicated Support:
UiPath doesn’t offer dedicated technical support for users of the Community Edition. You’ll primarily rely on the online community forum and documentation for assistance.
Focus on Learning and Development:
The Community Edition is primarily intended for individual learning, development, and proof-of-concept purposes. It may not be suitable for production environments due to the limitations mentioned above.
Here’s a table summarizing the key limitations:
Feature
Community Edition Limitations
Number of Robots
Maximum of 2 attended robots
Orchestrator
Cloud-hosted with limited features compared to Enterprise Orchestrator
Connectors
Subset of connectors available compared to Enterprise Editions
Support
No dedicated technical support
Use Case
Learning, development, and proof-of-concept purposes
Explain the types of robots that can be configured in Orchestrator?
In UiPath Orchestrator, you manage two robot types:
Attended Robots: Work alongside humans, requiring user interaction at times. Configure machine association, user permissions, and licenses within Orchestrator.
Unattended Robots: Run on dedicated machines for unattended execution. Configure machine templates for deployment, schedule workflows, or set up triggers for automated starts.
Choose the right type based on your automation needs: human interaction or independent execution. Orchestrator also provides monitoring, logging, and update functionalities.
What is a custom activity?
In UiPath, a custom activity is a reusable building block that extends the functionality of UiPath Studio beyond its standard set of activities. You can develop custom activities to automate specific tasks or processes that aren’t readily available with pre-built activities. This allows you to tailor UiPath to your unique automation requirements.
Here’s a breakdown of the steps involved in creating a custom activity:
1. Setting Up the Development Environment:
Visual Studio: You’ll need Visual Studio with the UiPath Activities development template installed. This template provides the necessary framework for creating custom activities.
UiPath.Activities Package: Ensure you have the UiPath.Activities NuGet package installed within your Visual Studio project. This package includes essential classes and functionalities for building custom activities.
2. Creating a New Project:
In Visual Studio, create a new project using the “UiPath Activities Template.”
Provide a name and location for your project and solution.
3. Defining the Activity:
Within the project, you’ll find a “CustomActivity.cs” file (or similar naming convention). This file serves as the foundation for defining your custom activity.
Here, you’ll specify the following aspects of your activity:
Name: A clear and descriptive name for your activity.
Description: A brief explanation of what the activity does.
Properties: Define the input and output properties of your activity. These properties allow you to pass data into and retrieve data from the activity during workflow execution.
Implementation: Write the code that encapsulates the core functionality of your activity. This code typically interacts with various applications, systems, or performs calculations based on the provided input.
4. Building and Testing:
Once you’ve defined your activity’s properties and implementation, build the project in Visual Studio. This generates the necessary files for your custom activity.
Test your custom activity within a UiPath Studio workflow to ensure it functions as expected. You can pass different input values and verify the output results.
5. (Optional) Publishing the Activity:
You can package your custom activity into a reusable library for sharing within your team or organization. UiPath Orchestrator offers functionalities for managing and deploying custom activity libraries.
Additional Tips:
Refer to UiPath documentation for detailed guidance on custom activity development, including code examples and best practices.
Leverage existing code libraries or frameworks when applicable to streamline your custom activity development.
Pay close attention to error handling and exception management within your custom activity code.
By following these steps and best practices, you can create valuable custom activities in UiPath, enhancing your automation capabilities and addressing specific needs within your RPA projects.
What are reusable components in UiPath?
In UiPath, reusable components refer to pre-built functionalities that you can incorporate into your Robotic Process Automation (RPA) workflows to enhance efficiency and maintainability. These components can be workflows themselves or smaller building blocks like custom activities or libraries.
Types of Reusable Components in UiPath:
Workflow Templates: These are pre-defined workflows that serve as a starting point for building similar automations. You can customize them to fit your specific needs.
Custom Activities: These are custom-developed activities that encapsulate specific functionalities you can use within your workflows. They allow you to extend UiPath’s capabilities to address unique automation requirements.
Libraries: These are collections of reusable components, including workflows, custom activities, and variables. Libraries group related functionalities together, promoting organization and facilitating reuse across projects.
How to Create Reusable Components:
Identify Common Functionalities: Analyze your automation needs and identify tasks or processes that can be generalized for reuse in various scenarios.
Design and Develop Components: Create workflows, custom activities, or libraries encapsulating the reusable functionalities. Ensure proper documentation and clear naming conventions.
Test and Publish (Optional): Thoroughly test your reusable components before integrating them into workflows. Consider publishing them to a shared library within UiPath Orchestrator for wider team access.
By effectively utilizing reusable components, you can streamline your RPA development process, improve workflow maintainability, and promote consistency across your automations in UiPath.
What is the primary difference between Step into and Step in UiPath?
There appears to be a slight terminology inconsistency here. In UiPath debugging, the correct terms are “Step Into” and “Step Over”. While their names sound similar, they have distinct functionalities during workflow execution.
Here’s a table outlining the key differences between Step Into and Step Over:
Feature
Step Into
Step Over
Action
Enters the execution of the current activity.
Executes the current activity but does not enter it.
Child Activities
If the current activity has child activities, execution jumps into the first child.
Moves to the next activity in the workflow sequence.
Use Case
Ideal for debugging complex activities or those with child activities you want to examine step-by-step.
Suitable for quickly traversing through the workflow, observing variable values and overall execution flow.
Analogy:
Imagine you’re following a recipe (your workflow).
Step Into: Like meticulously following each step, entering each instruction (child activity) to understand its details.
Step Over: Like skimming through the recipe, executing each step (activity) without getting into specifics but ensuring the overall flow progresses.
Choosing the Right Option:
Use Step Into when you need to delve into the inner workings of an activity, especially one with child activities or complex logic.
Use Step Over for a broader view of the workflow execution, observing variable updates and activity completion without getting bogged down in individual activity details.
By understanding these differences, you can effectively navigate through your UiPath workflows during debugging, pinpointing issues and optimizing your automation processes.
What is an output panel?
In UiPath Studio, the Output panel acts as a communication window, displaying messages and logs generated during workflow execution. It provides valuable insights into the automation process, helping you monitor progress, identify errors, and debug your workflows effectively.
Here’s a breakdown of the Output panel’s functionality:
What it Shows:
Success Messages: Confirms successful completion of activities within your workflow.
Error Messages: Highlights any errors encountered during execution, pinpointing potential issues in your automation logic.
Warnings: Flags potential problems that might not necessarily halt execution but could lead to unexpected results.
Debugging Information: Provides detailed logs when running your workflow in debug mode, offering step-by-step insights into variable values and activity execution.
Benefits of Using the Output Panel:
Monitoring Execution: Helps you track the workflow’s progress in real-time, identifying successful completions or potential roadblocks.
Troubleshooting Errors: Pinpoints the location and nature of errors, enabling you to diagnose and fix issues efficiently.
Debugging Workflows: When using debug mode, the Output panel provides a granular view of variable values and activity execution, aiding in identifying logical errors or unexpected behavior.
Log Analysis: Offers a record of the workflow’s execution history, which can be helpful for auditing purposes or analyzing trends.
Customizing the Output Panel:
Filtering Messages: You can filter the messages displayed in the Output panel by level (e.g., errors only, warnings and above) to focus on specific types of information.
Double-clicking Messages: Provides more detailed information about a specific message, potentially including error stack traces or additional context.
What is an outline panel?
In UiPath Studio, the Outline panel is your navigation hub for RPA workflows. It shows a hierarchy of elements: workflows, activities within those workflows, and any variables you’ve defined. This lets you jump to specific parts of your workflow, understand its structure, and manage activities efficiently. It’s essentially a roadmap for your automation, simplifying navigation and organization.
What is the way to automate excel macro using UiPath?
There are two main approaches to automate Excel macros using UiPath:
Method 1: Using the “Execute Macro” Activity
This method is suitable if your macro doesn’t require any input arguments.
Steps:
Drag and drop the “Excel Application Scope” activity onto the workflow designer. This activity ensures proper interaction with the Excel application.
Inside the “Excel Application Scope” activity:
Use the “Attach Window” activity: Specify the title or handle of the Excel window containing the workbook with the macro.
Drag and drop the “Execute Macro” activity.
In the “Execute Macro” properties:
Macro Name: Enter the exact name of the macro you want to execute within the workbook.
Save and run your UiPath workflow. UiPath will attach to the Excel window, execute the specified macro, and then detach.
Method 2: Using VBA and “Invoke VBA” Activity (For Macros with Input)
This method is necessary if your macro requires input arguments.
Steps:
In your Excel VBA editor, modify your macro to accept arguments. You can achieve this by defining parameters within the VBA code for the data you want to pass from UiPath.
Drag and drop the “Excel Application Scope” activity onto the workflow designer.
Inside the “Excel Application Scope” activity:
Use the “Attach Window” activity as mentioned in Method 1.
Drag and drop the “Invoke VBA” activity.
In the “Invoke VBA” properties:
Workbook: Specify the path to the Excel workbook containing the macro.
Function Name: Enter the exact name of the macro you want to execute.
Arguments: Define the values you want to pass to the macro’s arguments (ensure the order and data types match the VBA code). You can use variables created in UiPath to store these values.
Save and run your UiPath workflow. UiPath will execute the VBA code with the provided arguments.
Additional Considerations:
Ensure the Excel macro is functional and error-free before attempting automation.
UiPath needs to be able to access the Excel workbook containing the macro.
For complex scenarios, consider error handling mechanisms within your UiPath workflow to address potential issues during macro execution.
By following these steps and choosing the appropriate method, you can effectively automate your Excel macros using UiPath, streamlining your workflow and reducing manual efforts.
List sections which are available in UiPath
UiPath Studio Sections
Section Name
Description
Location
Project Panel
Manages project structure, including folders, workflows, and libraries.
Left side of the interface.
Activity Panel
Provides a library of pre-built activities for various functionalities.
Right side of the interface (often next to Project Panel).
Workflow Designer
Central workspace for visually building automation workflows by arranging activities.
Center of the interface.
Properties Panel
Displays and allows configuration of properties for the selected activity in the Workflow Designer.
Right side of the interface (often docked next to Activity Panel).
Output Panel
Shows execution messages and logs, including successes, errors, and debugging details.
Bottom of the interface.
Additional Sections (Depending on View)
Toolbox
Offers quick access to frequently used activities or variables.
Varies depending on the current view.
Designer
Provides a more detailed view of the workflow with zooming and panning capabilities.
Varies depending on the current view.
Variables
Lists all variables defined within your project for storing and managing data.
Varies depending on the current view (often accessible through a dedicated tab).
What is the difference between while and do while activity?
Feature
While Activity
Do While Activity
Execution Logic
Checks the condition before executing the loop body.
Executes the loop body at least once, then checks the condition.
Loop Continuation
Loop continues as long as the condition is true.
Loop continues as long as the condition is true.
Minimum Iterations
May execute the loop body zero times if the condition is initially false.
Executes the loop body at least once, regardless of initial condition.
Use Case
Ideal for scenarios where the loop might not need to iterate at all if the condition is initially false.
Ideal for scenarios where an action needs to happen at least once, and then the loop iterates based on a condition.
What are the types of Robots?
In UiPath, you have two main robot types:
Attended Robots: Work alongside humans, requiring user input or supervision at times. Ideal for tasks needing human judgment or validation.
Unattended Robots: Run on dedicated machines, handling repetitive tasks without human intervention. Perfect for 24/7 automation and eliminating human error in rule-based processes.
Choose the right type based on your automation needs – human interaction or independent execution. What is the primary difference between the Attended & Unattended bot?
Robot Type
Description
Functionality
Benefits
Use Cases
Attended Robots
Designed for scenarios where human interaction is required during the automation process.
Run under the supervision of a human user, typically on the same machine as the user’s desktop. May require user input, confirmation, or intervention at specific points in the automation workflow.
* Ideal for tasks requiring human judgment or decision-making during automation. * Suitable for situations where user input or validation is necessary. * Provide a smoother transition to automation by allowing human-in-the-loop execution.
* Processing loan applications with manual verification steps. * Data entry tasks where human review of extracted information might be needed. * Customer service interactions requiring a combination of automated responses and human empathy.
Unattended Robots
Built for autonomous execution without human intervention.
Run on dedicated machines (often virtual machines) within a UiPath Orchestrator environment. Scheduled or triggered to execute workflows automatically based on predefined criteria. Handle tasks that are highly repetitive, rule-based, and don’t require human judgment.
* Enable 24/7 automation, maximizing efficiency and processing speed. * Reduce reliance on manual intervention, freeing up human resources for more strategic tasks. * Improve process consistency and accuracy by eliminating human error in repetitive tasks.
* Generating reports and sending them automatically to stakeholders. * Processing large volumes of invoices or customer transactions overnight. * Migrating data between different systems without needing human oversight.
Mention the tools needed to read and send mail
There are two primary approaches to read and send emails in UiPath, each requiring a different set of tools:
1. Using Outlook Activities:
Tools:
UiPath Studio: The core development environment for building UiPath workflows.
UiPath.Outlook.Activities package: This package provides activities specifically designed for interacting with Microsoft Outlook. You’ll need to install this package within UiPath Studio.
Process:
Drag and drop the desired Outlook activities (e.g., “Get Outlook Mail Messages”, “Send Outlook Mail Message”) into your workflow.
Configure the activities with details like email folders, recipient addresses, message content, and attachment paths.
2. Using Email Protocols (IMAP, SMTP):
Tools:
UiPath Studio: The core development environment for building UiPath workflows.
UiPath.System.Activities package: This package includes activities for working with various protocols, including email protocols like IMAP (reading) and SMTP (sending). You’ll need to install this package within UiPath Studio.
Additional Information: You’ll need the server details (IMAP/SMTP server address, port number) and credentials (username, password) for your email account.
Process:
Drag and drop the relevant email protocol activities (e.g., “Get IMAP Mail Messages”, “Send SMTP Mail Message”) into your workflow.
Configure the activities with server details, credentials, email content, and attachment paths (if applicable).
Choosing the Right Approach:
Use Outlook Activities if:
You primarily work with Microsoft Outlook as your email client.
You need functionalities specific to Outlook, such as managing folders or moving emails.
Use Email Protocols if:
You need to interact with email accounts that are not connected to Outlook.
You require more granular control over the email interaction process.
Additional Considerations:
Security: Always ensure proper credential management practices when storing email account passwords within your UiPath workflows.
Error Handling: Implement robust error handling mechanisms to address potential issues during email communication (e.g., connection failures, authentication errors).
By understanding these tools and approaches, you can effectively configure UiPath to handle your email automation needs.
What are the types of input methods for click and type action?
In UiPath, there are three main types of input methods for click and type actions:
Simulate (Default):
This is the recommended method for most scenarios.
It leverages the target application’s technology to perform clicks and typing actions.
Benefits:
Faster execution speed.
Works in the background without interfering with the user interface.
Limitations:
Might not support sending special keyboard shortcuts.
SendWindowMessages:
This method sends specific messages directly to the target application’s window.
Use cases:
When Simulate doesn’t work for certain clicks or menus.
If the automation needs to interact with the UI while it’s minimized.
Considerations:
Might be slower than Simulate.
Requires precise targeting of the window handle for successful interaction.
Default:
This is the fallback method used if neither Simulate nor SendWindowMessages is explicitly chosen.
It relies on the UiPath Studio to simulate clicks and typing actions using the system’s hardware drivers.
Generally less preferred due to:
Slower execution compared to Simulate.
Potential compatibility issues across different systems.
Here’s a table summarizing the key points:
Input Method
Description
Best Use Case
Simulate (Default)
Uses target application’s technology for clicks and typing. (Recommended)
Most scenarios. Faster execution, works in background.
SendWindowMessages
Sends messages directly to the target application’s window.
When Simulate doesn’t work or background interaction is needed. May be slower, requires precise window targeting.
Default
Fallback method using system hardware drivers.
Not recommended as a primary choice due to slower speed and potential compatibility issues.
Remember, the recommended approach is to start with “Simulate” for its speed and background execution capabilities. If you encounter issues, then explore “SendWindowMessages” for specific scenarios. Only use “Default” as a last resort if the other methods are not compatible.
What is an Orchestration job?
In UiPath, an Orchestration Job represents the execution of a specific process by a UiPath Robot. It acts as the bridge between the process definition and its actual execution within the robotic automation environment.
Here’s a breakdown of Orchestrator Jobs:
Core Function:
An Orchestration Job triggers the execution of a pre-defined UiPath process (usually an RPA workflow).
It provides a central platform to manage, schedule, and monitor these process executions.
Types of Orchestration Jobs:
Attended Jobs: Robots run under the supervision of a human user, typically requiring user interaction during execution. These jobs are often initiated from the UiPath Assistant interface.
Unattended Jobs: Robots run independently without human intervention. These jobs are typically scheduled or triggered automatically based on predefined criteria within Orchestrator.
Benefits of Using Orchestration Jobs:
Centralized Management: Provides a single point of control for launching, monitoring, and managing all robot executions.
Improved Scheduling and Automation: Enables scheduling of unattended jobs for execution at specific times or based on triggers.
Enhanced Visibility and Control: Offers detailed logs and reports on job execution status, success/failure rates, and robot performance.
Error Handling and Recovery: Orchestrator facilitates defining error handling strategies and potentially restarting failed jobs.
Creating and Launching Orchestration Jobs:
UiPath Orchestrator provides a user interface for creating and managing Orchestration Jobs. You can specify the following details:
Process: Select the UiPath process (workflow) to be executed.
Robot: Assign the job to a specific robot or a robot queue for automatic allocation.
Arguments: Define any input arguments required by the selected process.
Execution Mode: Choose between attended or unattended execution.
Scheduling: Optionally, schedule the job for a specific time or configure triggers for automated execution.
What is difference between Excel and Workbook activities in UiPath?
The main difference between Excel and Workbook activities in UiPath lies in their approach to interacting with Excel files and the necessity of having Microsoft Excel installed on the system running the automation.
Excel Activities:
Dependency: Require Microsoft Excel to be installed on the machine executing the UiPath robot.
Functionality: Offer a wider range of functionalities, including:
Working with charts and diagrams.
Reading and writing cell colors.
Executing macros within the Excel workbook.
Upsides:
Provide more comprehensive control over Excel file manipulation.
Can leverage existing Excel features like macros for complex tasks.
Downsides:
Reliance on Microsoft Excel installation creates an additional dependency.
May not be ideal for scenarios where robot execution occurs on machines without Excel.
Workbook Activities:
Dependency: Do not require Microsoft Excel to be installed. UiPath handles all interactions with the Excel file.
Functionality: Focus on core data manipulation tasks within spreadsheets, including:
Reading and writing cell values.
Performing calculations and data transformations.
Creating and formatting worksheets.
Upsides:
More portable solution as they don’t rely on external software.
Suitable for scenarios where robot execution might occur on machines without Excel.
Downsides:
Limited functionality compared to Excel Activities, particularly for advanced tasks like charts or macros.
Here’s a table summarizing the key differences:
Feature
Excel Activities
Workbook Activities
Dependency
Requires Microsoft Excel
No Excel installation required
Functionality
Broader (charts, diagrams, macros)
Core data manipulation
Upsides
More control, leverages Excel
Portable, no Excel dependency
Downsides
Requires Excel installation
Limited functionality
Choosing the Right Activity:
The optimal choice depends on your specific needs:
If you need advanced features like charts, macros, or cell color manipulation, and Excel is available, use Excel Activities.
If you prioritize portability or don’t have Excel installed, Workbook Activities are the way to go for basic data manipulation tasks.
By understanding these differences, you can effectively select the appropriate activities for your UiPath workflows to achieve seamless interaction with Excel file
What is Anchor base in UiPath?
Anchor Base in UiPath is an activity used to locate UI elements on the screen relative to other, more stable elements. It’s particularly helpful when dealing with dynamic UIs where element IDs or other properties might change frequently.
Here’s a breakdown of how Anchor Base works:
Target Element: You identify a reliable element on the screen that’s unlikely to change (often called the anchor). This could be a static text label, a menu bar, or another element that consistently appears in the same location.
Relative Position: You specify the position of the target UI element you want to interact with relative to the anchor element. Options include Left, Right, Above, Below, or other directional placements.
Action: Within the Anchor Base activity, you define the action you want to perform on the target element. This could be clicking a button, entering text into a field, or any other interaction supported by UiPath activities.
Benefits of Using Anchor Base:
Overcomes UI Fragility: By relying on relative positioning to the anchor element, Anchor Base helps you avoid issues caused by changes in element IDs or other properties.
Improves Automation Reliability: By targeting a stable element first, Anchor Base ensures your automation can locate the desired element even if its position or properties shift slightly.
Enhanced Maintainability: Your automation logic becomes less dependent on specific element properties, making it easier to maintain and update in the future.
Use Cases for Anchor Base:
Automating login processes where username and password fields might have dynamic IDs.
Interacting with elements within a specific section of the UI that rearranges itself occasionally.
Clicking buttons or links that don’t have unique identifiers but are positioned consistently relative to another element.
Here’s an analogy: Imagine searching for a specific book in a library. Instead of memorizing the exact shelf number (which might change), you use a landmark like a pillar to locate the general area and then look for the book relative to that pillar. Anchor Base employs a similar approach for UI element interaction.
In Conclusion:
Anchor Base is a valuable tool in UiPath workflows when dealing with dynamic UIs. By leveraging relative positioning, it enhances automation reliability and makes your workflows more adaptable to changes in the target application’s interface.
Explain Email automation
Email automation refers to the process of using software to automatically send and receive emails. This eliminates the need for manual intervention and repetitive tasks, saving time and increasing efficiency. Here’s a breakdown of key aspects of email automation:
Benefits:
Increased Efficiency: Automates repetitive tasks like sending mass emails, generating reports, or responding to inquiries, freeing up human resources for more strategic work.
Improved Accuracy: Reduces errors associated with manual data entry and ensures consistency across emails.
Enhanced Personalization: Enables sending personalized emails with dynamic content based on recipient data, leading to higher engagement rates.
Streamlined Workflows: Integrates email automation with other applications like CRM systems for a more seamless workflow.
24/7 Availability: Emails can be sent and received automatically at any time, regardless of location or time zone.
Common Use Cases:
Marketing Campaigns: Automate sending newsletters, promotional offers, or event invitations to large audiences.
Transactional Emails: Automatically send order confirmations, invoices, shipping notifications, or password resets.
Customer Support: Set up automated responses to frequently asked questions or send follow-up emails after interactions.
Onboarding and Reminders: Send automated welcome emails, course materials, or appointment reminders.
Report Generation and Distribution: Automate generating reports and sending them to relevant stakeholders via email.
Types of Email Automation:
Triggered Emails: Emails sent automatically based on a specific event or action, such as a new customer signup or abandoned shopping cart.
Campaign Emails: Mass emails sent to a targeted list of recipients for marketing or promotional purposes.
Transactional Emails: Emails sent to confirm transactions, provide account updates, or deliver essential information.
Workflow Emails: Emails sent as part of a larger automated workflow, often integrated with other systems.
Tools for Email Automation:
Marketing Automation Platforms: Offer comprehensive features for email marketing campaigns, including list management, segmentation, and analytics.
Email Service Providers (ESPs): Provide basic email sending and automation functionalities, often integrated with website hosting services.
Robotic Process Automation (RPA) Tools: Can automate sending and receiving emails as part of larger workflow automations.
Getting Started with Email Automation:
Define your goals and target audience.
Choose an email automation tool that meets your needs.
Design your email templates and content.
Set up triggers or workflows for automated sending.
Monitor and analyze results to optimize your campaigns.
By implementing email automation effectively, you can streamline communication, improve customer engagement, and achieve significant business benefits.
How to filter mail using UiPath?
Filtering Emails in UiPath: A Two-Step Approach
UiPath offers two primary activities to filter emails based on specific criteria:
1. Get Outlook Mail Messages:
This activity retrieves emails from your Outlook inbox. You can then use filtering options within the activity itself to narrow down the retrieved emails.
Steps 1:
Drag and drop the “Get Outlook Mail Messages” activity into your workflow.
Configure the activity properties:
Folder: Specify the Outlook folder to search (e.g., Inbox).
Filter: Click the “Filter” button.
Condition Builder: Use the graphical interface to define your filtering criteria. You can filter based on various fields like sender email address, subject line, keywords, received date, etc.
The activity will retrieve only emails that meet your specified filter conditions.
2. Filter Collection (For More Complex Scenarios):
This approach is ideal for situations where you need to perform additional filtering after retrieving emails using another activity (like “Get IMAP Mail Messages”).
Steps 2:
Use an activity like “Get IMAP Mail Messages” to retrieve emails.
Drag and drop the “Filter Collection” activity after the email retrieval activity.
Configure the “Filter Collection” activity:
Items: Set this to the variable containing the list of retrieved emails.
Filter By: Define a custom filtering expression using VB.NET syntax. You can access email properties like sender address, subject, etc., within the expression.
The activity will return a new collection containing only emails that match your filter expression.
Additional Tips:
Explore the available filter options within the “Get Outlook Mail Messages” activity for common filtering scenarios.
For complex filtering logic, leverage the “Filter Collection” activity and VB.NET expressions for greater control.
Utilize UiPath documentation and online resources for detailed information on specific filtering criteria and VB.NET expressions for email properties.
By following these steps and exploring the available activities, you can effectively filter emails in UiPath to streamline your automation workflows and focus on relevant messages.
What are the best practices for scaling RPA initiatives within an organization?
Start with a Robust Foundation:
Best Practice: Lay a solid groundwork by thoroughly understanding current processes and selecting the right RPA tools that align with organizational goals.
Prioritize Processes Strategically:
Best Practice: Begin automation with high-impact, rule-based processes to demonstrate quick wins and build confidence among stakeholders.
Establish a Center of Excellence (CoE):
Best Practice: Form a dedicated team to oversee RPA implementations, ensuring standardized practices, knowledge sharing, and continuous improvement.
Promote Cross-Functional Collaboration:
Best Practice: Encourage collaboration between IT and business teams to ensure RPA solutions align with both technical requirements and business objectives.
Focus on Employee Training:
Best Practice: Invest in comprehensive training programs to upskill employees and enable them to work seamlessly with RPA tools, fostering a culture of innovation.
Implement Robust Governance:
Best Practice: Establish governance mechanisms to monitor, evaluate, and optimize automated processes, ensuring compliance and security.
Scale Gradually with Monitoring:
Best Practice: Scale RPA implementations gradually, closely monitoring performance and addressing challenges promptly to avoid disruptions.
Incorporate Continuous Improvement:
Best Practice: Foster a culture of continuous improvement, regularly reviewing and optimizing automated processes to adapt to changing business needs.
Stay Informed About RPA Trends:
Best Practice: Keep abreast of the latest RPA trends and advancements, incorporating innovative solutions to enhance efficiency and stay competitive.
Communicate Success Stories:
Best Practice: Share success stories and benefits achieved through RPA to build enthusiasm, gain executive support, and encourage broader adoption across the organization.
Explain PDF automation
PDF automation in UiPath streamlines tasks involving extracting data, manipulating content, and interacting with Portable Document Formats (PDFs). Here’s a breakdown of key functionalities and their applications:
1. Extracting Text from PDFs:
Activities:
Read PDF Text: Extracts all text content from a PDF.
Read PDF with OCR: Uses Optical Character Recognition (OCR) to convert scanned text or images within PDFs into editable text.
Applications:
Populate data from invoices, receipts, or reports into other applications.
Analyze textual content within PDFs for sentiment analysis or keyword extraction.
2. Data Extraction from Tables:
Activities:
Read PDF with Tables: Extracts data in a structured table format from PDFs.
Data Scraping: More advanced scraping techniques can handle complex table structures.
Applications:
Populate databases or spreadsheets with information from product catalogs or financial statements.
Automate data entry tasks from standardized PDF reports.
3. Merging and Splitting PDFs:
Activities:
Merge PDF Documents: Combines multiple PDFs into a single document.
Split PDF: Splits a single PDF into separate documents based on page ranges or bookmarks.
Applications:
Generate consolidated reports from various sources.
Extract specific sections from a PDF for further processing.
4. Form Filling and Data Entry:
Activities:
Type Into PDF: Inputs text into fillable PDF forms.
Click PDF: Simulates clicking buttons or checkboxes within interactive PDFs.
Applications:
Automate pre-filling application forms or data entry processes based on predefined data.
5. PDF Password Management and Security:
Activities:
Set PDF Password: Encrypts a PDF document with a password.
Remove PDF Password: Decrypts a password-protected PDF.
Applications:
Secure sensitive information within PDFs by password protection.
Remove passwords from authorized PDFs for further processing.
Benefits of PDF Automation in UiPath:
Increased Efficiency: Automates repetitive PDF tasks, saving time and resources.
Improved Accuracy: Reduces manual data entry errors and ensures data consistency.
Enhanced Scalability: Handles large volumes of PDFs efficiently.
Streamlined Workflows: Integrates seamlessly with other UiPath activities for comprehensive document processing.
Getting Started with PDF Automation:
Install the UiPath.PDF.Activities package.
Explore the available PDF activities in the Activities panel.
Drag and drop activities into your workflow to design your automation logic.
Configure activity properties to specify the target PDF, extraction methods, and output formats.
By leveraging UiPath’s PDF automation capabilities, you can unlock new levels of efficiency and accuracy in handling your PDF-related tasks.
UiPath Jobs - Trends
Global Robotic Process Automation (RPA) Market Size:
The demand for UiPath professionals has been on the rise. Companies across various industries are adopting RPA, leading to a surge in UiPath job opportunities.
UiPath Developer Career Path
As a UiPath developer, you can progress through different levels.
Junior RPA Developer: Entry-level position, focusing on building and maintaining automation workflows.
RPA Developer: Experienced in designing complex automations and integrating with other systems.
RPA Solution Architect: Responsible for overall automation strategy and design.
RPA Project Manager: Manages RPA projects and teams.
UiPath Developer Role and Responsibilities
UiPath developers create, test, and deploy RPA bots. Their responsibilities include:
Analyzing business processes for automation.
Designing and developing automation workflows.
Debugging and troubleshooting bots.
Collaborating with business analysts and stakeholders.
Pre-requisites for UiPath RPA Developer
Becoming a UiPath RPA Developer involves a combination of technical skills, knowledge, and practical experience. Here are the essential prerequisites:
Understanding of Robotic Process Automation (RPA):
Gain a solid understanding of what RPA is, its benefits, and how it can automate repetitive tasks in various business processes.
Programming and Scripting Skills:
Proficiency in at least one programming language (such as C#, Python, or Java) is crucial. UiPath uses VB.NET for creating automation workflows, so familiarity with it is advantageous.
UiPath Platform Knowledge:
Learn the UiPath ecosystem, including UiPath Studio (for designing workflows), UiPath Orchestrator (for managing bots), and UiPath Robot (for executing automation).
Process Understanding:
Understand the business processes you intend to automate. Analyze workflows, identify repetitive tasks, and determine where RPA can be applied effectively.
UiPath Certification:
Consider obtaining UiPath certifications. The UiPath Certified RPA Associate and UiPath Certified Advanced RPA Developer certifications validate your expertise.
Problem-Solving Skills:
As an RPA developer, you’ll encounter various challenges. Develop problem-solving abilities to troubleshoot issues and optimize automation workflows.
Hands-On Experience:
Practice building automation workflows using UiPath Studio. Work on sample projects, create bots, and explore different activities (such as data scraping, screen automation, and email automation).
Understanding of APIs and Web Services:
Many RPA tasks involve interacting with external systems. Familiarize yourself with APIs, RESTful services, and web requests.
Version Control:
Learn how to use version control systems (such as Git) to manage your automation projects effectively.
Soft Skills:
Effective communication, teamwork, and collaboration are essential. RPA developers often work closely with business analysts, stakeholders, and other team members.
UiPath Developer Salary As Per Experience
Here’s a rough breakdown of UiPath developer salaries based on experience (in USD):
Junior/Entry-Level: $50,000 – $70,000
Mid-Level: $70,000 – $100,000
Senior/Experienced: $100,000 – $150,000+
Keep in mind that salaries can vary based on factors like location, company size, and specific skills.
Experience Level
Salary Range (USD)
Junior/Entry-Level
$50,000 – $70,000
Mid-Level
$70,000 – $100,000
Senior/Experienced
$100,000 – $150,000+
Remember that these figures are approximate and can vary based on individual circumstances and market conditions. If you’re considering a career in UiPath RPA, continuous learning and staying updated with industry trends are essential for success!
Conclusion
I hope you have liked the My Post, UiPath Interview Questions And Answers 2024, Pls share your Questions to me and I will try my best to Provide all the Answers relater to UiPath interview. so you can get the Updated UiPath interview Question Bank List from my Side. In above Quation you will get the interview Questions related below list.
UiPath Interview Questions And Answers for UiPath Studio


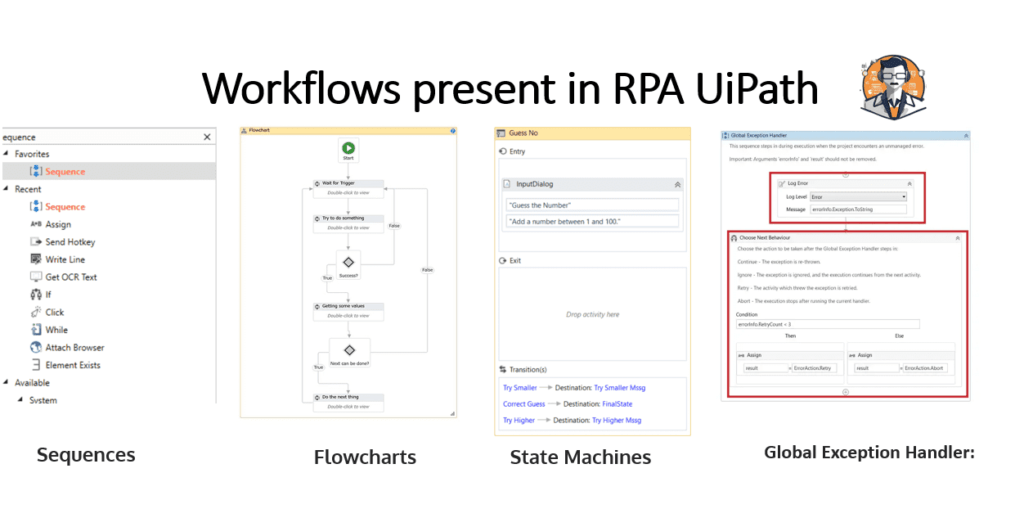
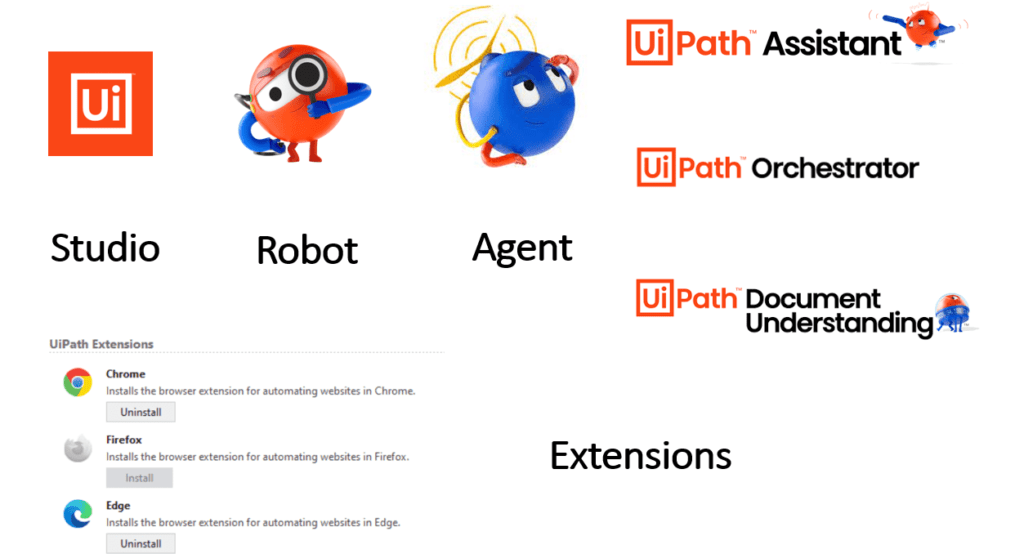
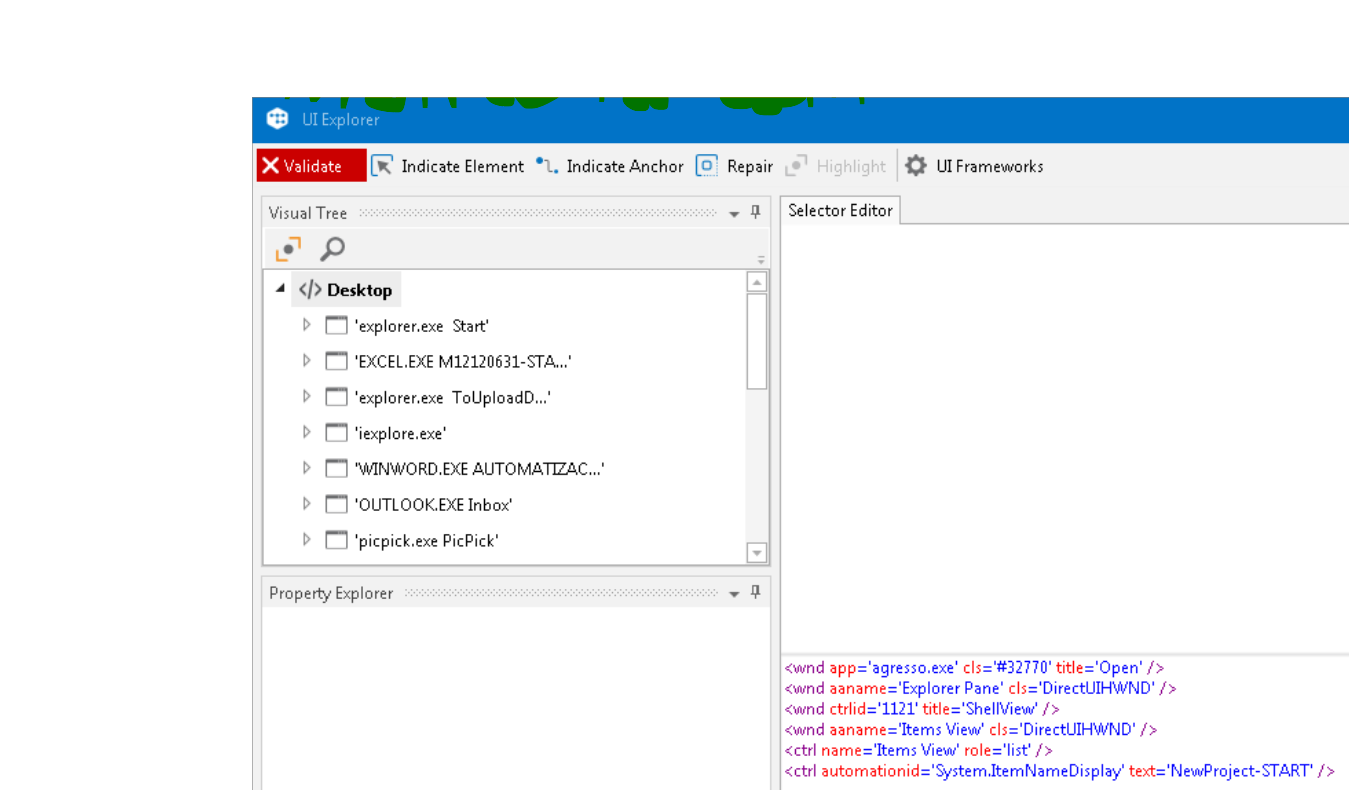
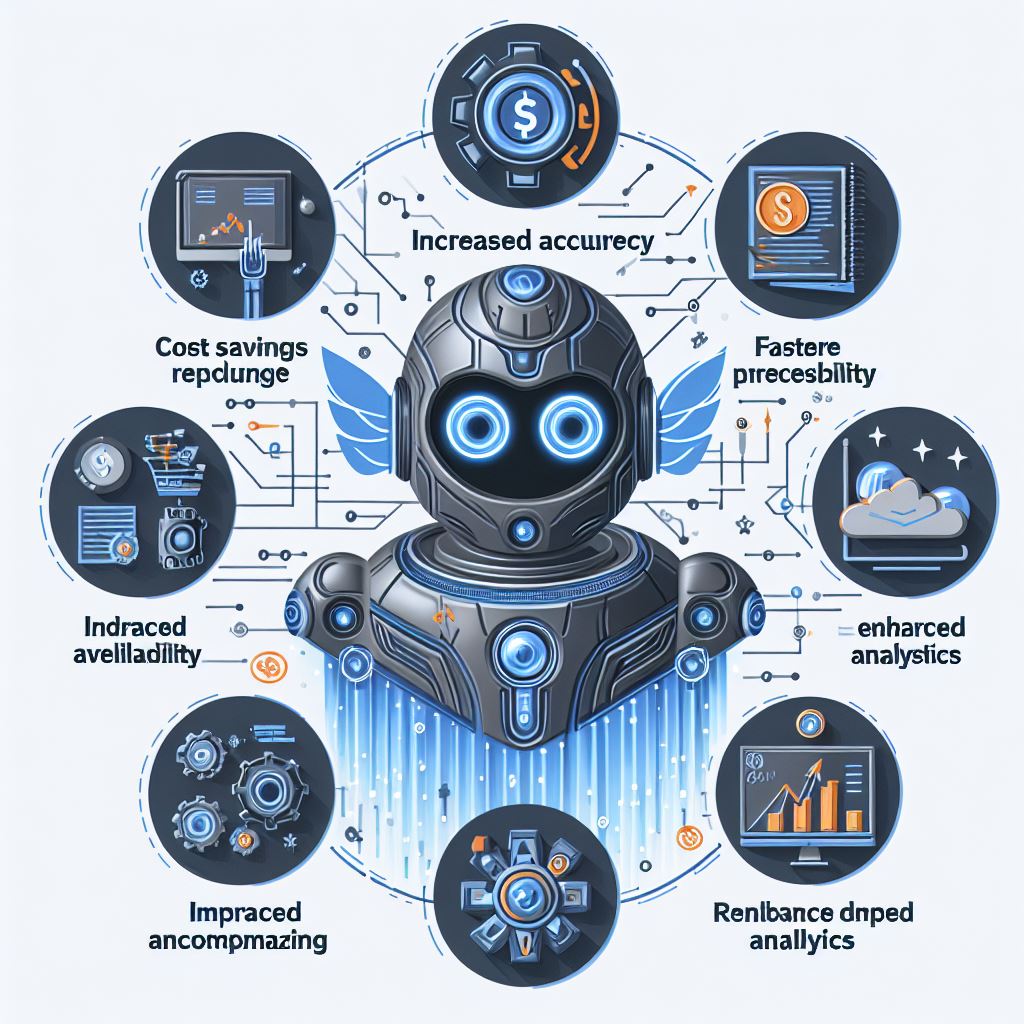
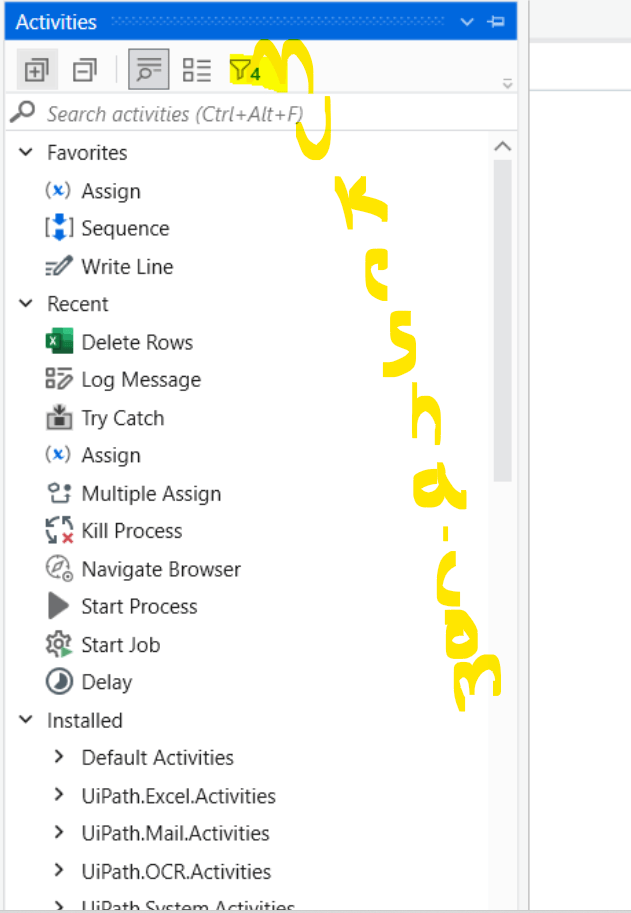

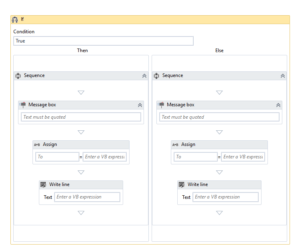
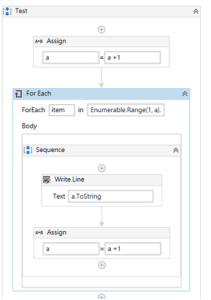 The For Each activity is your workhorse for repetitive tasks in UiPath. It iterates (loops) through a collection of items, one at a time, and executes a set of activities within the loop for each item.